I used Jetson Nano, Ubuntu 18.04 Official image with root account. And I always use python3. The source code introduced in this article can be downloaded here.
In the previous article, I described the use of OpenPose to estimate human pose using Jetson Nano and Jetson TX2. However, the performance is only 0.8 FPS in the nano and about 2 FPS in the TX2. In another article, I explained how to increase FPS using TensorFlow and a lightweight network model(It scored 4 ~ 5 FPS), and convert the lightweight models to tensorRT model to boost up. But the FPS is under 10. And the lightweight keypoint detection model's accuracy is not satisfactory. You can see this post at https://spyjetson.blogspot.com/2019/11/jetsonnano-human-pose-estimation-using.html.
I believe that performance should exceed 10 FPS for use in real-world projects. This time, I will again challenge 10 FPS using the TensorRT model provided by NVidia.
This post is a reference to https://github.com/NVIDIA-AI-IOT/trt_pose.
TensorRT Pose Estimation
This project features multi-instance pose estimation accelerated by NVIDIA TensorRT. It is ideal for applications where low latency is necessary. It includes-
Training scripts to train on any keypoint task data in MSCOCO format
-
A collection of models that may be easily optimized with TensorRT using torch2trt
Models
Below are models pre-trained on the MSCOCO dataset. The throughput in FPS is shown for each platform| Model | Jetson Nano | Jetson Xavier | Weights |
|---|---|---|---|
| resnet18_baseline_att_224x224_A | 22 | 251 | download (81MB) |
| densenet121_baseline_att_256x256_B | 12 | 101 | download (84MB) |
Prerequisites
For information on installing Jetpack 4.3 (December 2019), see https://spyjetson.blogspot.com/2020/02/jetson-nano-jetpack-43-sd-image.html.
Install PyTorch with JetPack 4.3
If you are want to use JetPack 4.4, skip to "Install PyTorch with JetPack 4.4".
Be careful : These packages are upgraded from time to time. So you should check the site first and find the latest version to install.
update(2020. 04) : upgrade to pytorch version 1.4
cd /usr/local/src wget https://nvidia.box.com/shared/static/phqe92v26cbhqjohwtvxorrwnmrnfx1o.whl -O torch-1.3.0-cp36-cp36m-linux_aarch64.whl
pip3 install torch-1.3.0-cp36-cp36m-linux_aarch64.whl #Next install torchvision 0.4.2 cd /usr/local/src git clone -b v0.4.2 https://github.com/pytorch/vision torchvision
cd torchvision
python3 setup.py install Before installing pytorch 1.4, visit this site to check the latest pytorch version.
If you do not have PyTorch installed, install it first.
Please see my other post about PyTorch Pose Estimation for more information.
wget https://nvidia.box.com/shared/static/ncgzus5o23uck9i5oth2n8n06k340l6k.whl -O torch-1.4.0-cp36-cp36m-linux_aarch64.whl
sudo apt-get install libopenblas-base
pip3 install torch-1.4.0-cp36-cp36m-linux_aarch64.whl

#install pillow first

apt install libjpeg8-dev zlib1g-dev libtiff-dev libfreetype6 libfreetype6-dev libwebp-dev libopenjp2-7-dev libopenjp2-7-dev -y
pip3 install pillow --global-option="build_ext" \
--global-option="--enable-zlib" \
--global-option="--enable-jpeg" \
--global-option="--enable-tiff" \
--global-option="--enable-freetype" \
--global-option="--enable-webp" \
--global-option="--enable-webpmux" \
--global-option="--enable-jpeg2000"


pip3 install torchvision
Install PyTorch with JetPack 4.4
I documented how to install JetPack 4.4 and PyTorch at https://spyjetson.blogspot.com/2020/07/jetson-nano-jetpack-44production.html. See the content of this blog.Install torch2trt
After installing PyTorch, install torch2trt.
cd /usr/local/src
git clone https://github.com/NVIDIA-AI-IOT/torch2trt
cd torch2trt
python3 setup.py install
Be careful : If PyTorch is not installed, an error occurs during the torch2trt installation process.
Installation
Follow these steps. Some packages might be already installed if you tested some of my posts.pip3 install tqdm cython pycocotools apt-get install python3-matplotlib cd /usr/local/src git clone https://github.com/NVIDIA-AI-IOT/trt_pose cd trt_pose python3 setup.py install
Click the above link and download the models. Use Web Browser to download the files. They are on the Google drive.
After the download is complete, move the files to directory "tasks/human_pose" directory.
If you want to download the file directly from google drive using the console command, use the following command.
cd tasks/human_pose
wget --load-cookies /tmp/cookies.txt "https://docs.google.com/uc?export=download&confirm=$(wget --quiet --save-cookies /tmp/cookies.txt --keep-session-cookies --no-check-certificate 'https://docs.google.com/uc?export=download&id=1XYDdCUdiF2xxx4rznmLb62SdOUZuoNbd' -O- | sed -rn 's/.*confirm=([0-9A-Za-z_]+).*/\1\n/p')&id=1XYDdCUdiF2xxx4rznmLb62SdOUZuoNbd" -O resnet18_baseline_att_224x224_A_epoch_249.pth
wget --load-cookies /tmp/cookies.txt "https://docs.google.com/uc?export=download&confirm=$(wget --quiet --save-cookies /tmp/cookies.txt --keep-session-cookies --no-check-certificate 'https://docs.google.com/uc?export=download&id=13FkJkx7evQ1WwP54UmdiDXWyFMY1OxDU' -O- | sed -rn 's/.*confirm=([0-9A-Za-z_]+).*/\1\n/p')&id=13FkJkx7evQ1WwP54UmdiDXWyFMY1OxDU" -O densenet121_baseline_att_256x256_B_epoch_160.pth
root@spypiggy-desktop:/usr/local/src/trt_pose/tasks/human_pose# ls -al
total 168776
drwxr-xr-x 3 root root     4096 12월 13 23:33 .
drwxr-xr-x 3 root root     4096 12월 13 23:10 ..
-rw-r--r-- 1 root root 87573944 12월 13 23:32 densenet121_baseline_att_256x256_B_epoch_160.pth
-rwxr-xr-x 1 root root      182 12월 13 23:10 download_coco.sh
-rw-r--r-- 1 root root    12027 12월 13 23:10 eval.ipynb
drwxr-xr-x 2 root root     4096 12월 13 23:10 experiments
-rw-r--r-- 1 root root      510 12월 13 23:10 human_pose.json
-rw-r--r-- 1 root root    10177 12월 13 23:10 live_demo.ipynb
-rw-r--r-- 1 root root     2521 12월 13 23:10 preprocess_coco_person.py
-rw-r--r-- 1 root root 85195117 12월 13 23:32 resnet18_baseline_att_224x224_A_epoch_249.pth
Get Keypoints From Image
Repo's example code is provided for Jupiter Notebook. So I modified some of this code for Python. And to use the keypoints later, I added code that shows the location of the keypoint and the body points it points to. And I'm used to using OpenCV. I will change the image processing to use OpenCV.At this point, it supports resnet18 and densenet121 models. So you can use --model options to choose the model you want to use. Use "--model=resnet" for resnet18_baseline_att_224x224_A, or use "--model=densenet" for densenet121_baseline_att_256x256_B.
Another option is the "--image" for selecting images.
import json
import trt_pose.coco
import trt_pose.models
import torch
import torch2trt
from torch2trt import TRTModule
import time
import cv2
import torchvision.transforms as transforms
import PIL.Image, PIL.ImageDraw
from trt_pose.draw_objects import DrawObjects
from trt_pose.parse_objects import ParseObjects
import argparse
import os.path

'''
img is PIL format
'''
def draw_keypoints(img, key):
    thickness = 5
    w, h = img.size
    draw = PIL.ImageDraw.Draw(img)
    #draw Rankle -> RKnee (16-> 14)
    if all(key[16]) and all(key[14]):
        draw.line([ int(key[16][2] * w), int(key[16][1] * h), int(key[14][2] * w), int(key[14][1] * h)],width = thickness, fill=(51,51,204))
    #draw RKnee -> Rhip (14-> 12)
    if all(key[14]) and all(key[12]):
        draw.line([ int(key[14][2] * w), int(key[14][1] * h), int(key[12][2] * w), int(key[12][1] * h)],width = thickness, fill=(51,51,204))
    #draw Rhip -> Lhip (12-> 11)
    if all(key[12]) and all(key[11]):
        draw.line([ int(key[12][2] * w), int(key[12][1] * h), int(key[11][2] * w), int(key[11][1] * h)],width = thickness, fill=(51,51,204))
    #draw Lhip -> Lknee (11-> 13)
    if all(key[11]) and all(key[13]):
        draw.line([ int(key[11][2] * w), int(key[11][1] * h), int(key[13][2] * w), int(key[13][1] * h)],width = thickness, fill=(51,51,204))
    #draw Lknee -> Lankle (13-> 15)
    if all(key[13]) and all(key[15]):
        draw.line([ int(key[13][2] * w), int(key[13][1] * h), int(key[15][2] * w), int(key[15][1] * h)],width = thickness, fill=(51,51,204))

    #draw Rwrist -> Relbow (10-> 8)
    if all(key[10]) and all(key[8]):
        draw.line([ int(key[10][2] * w), int(key[10][1] * h), int(key[8][2] * w), int(key[8][1] * h)],width = thickness, fill=(255,255,51))
    #draw Relbow -> Rshoulder (8-> 6)
    if all(key[8]) and all(key[6]):
        draw.line([ int(key[8][2] * w), int(key[8][1] * h), int(key[6][2] * w), int(key[6][1] * h)],width = thickness, fill=(255,255,51))
    #draw Rshoulder -> Lshoulder (6-> 5)
    if all(key[6]) and all(key[5]):
        draw.line([ int(key[6][2] * w), int(key[6][1] * h), int(key[5][2] * w), int(key[5][1] * h)],width = thickness, fill=(255,255,0))
    #draw Lshoulder -> Lelbow (5-> 7)
    if all(key[5]) and all(key[7]):
        draw.line([ int(key[5][2] * w), int(key[5][1] * h), int(key[7][2] * w), int(key[7][1] * h)],width = thickness, fill=(51,255,51))
    #draw Lelbow -> Lwrist (7-> 9)
    if all(key[7]) and all(key[9]):
        draw.line([ int(key[7][2] * w), int(key[7][1] * h), int(key[9][2] * w), int(key[9][1] * h)],width = thickness, fill=(51,255,51))

    #draw Rshoulder -> RHip (6-> 12)
    if all(key[6]) and all(key[12]):
        draw.line([ int(key[6][2] * w), int(key[6][1] * h), int(key[12][2] * w), int(key[12][1] * h)],width = thickness, fill=(153,0,51))
    #draw Lshoulder -> LHip (5-> 11)
    if all(key[5]) and all(key[11]):
        draw.line([ int(key[5][2] * w), int(key[5][1] * h), int(key[11][2] * w), int(key[11][1] * h)],width = thickness, fill=(153,0,51))


    #draw nose -> Reye (0-> 2)
    if all(key[0][1:]) and all(key[2]):
        draw.line([ int(key[0][2] * w), int(key[0][1] * h), int(key[2][2] * w), int(key[2][1] * h)],width = thickness, fill=(219,0,219))

    #draw Reye -> Rear (2-> 4)
    if all(key[2]) and all(key[4]):
        draw.line([ int(key[2][2] * w), int(key[2][1] * h), int(key[4][2] * w), int(key[4][1] * h)],width = thickness, fill=(219,0,219))

    #draw nose -> Leye (0-> 1)
    if all(key[0][1:]) and all(key[1]):
        draw.line([ int(key[0][2] * w), int(key[0][1] * h), int(key[1][2] * w), int(key[1][1] * h)],width = thickness, fill=(219,0,219))

    #draw Leye -> Lear (1-> 3)
    if all(key[1]) and all(key[3]):
        draw.line([ int(key[1][2] * w), int(key[1][1] * h), int(key[3][2] * w), int(key[3][1] * h)],width = thickness, fill=(219,0,219))

    #draw nose -> neck (0-> 17)
    if all(key[0][1:]) and all(key[17]):
        draw.line([ int(key[0][2] * w), int(key[0][1] * h), int(key[17][2] * w), int(key[17][1] * h)],width = thickness, fill=(255,255,0))
    return img

'''
hnum: 0 based human index
kpoint : index + keypoints (float type range : 0.0 ~ 1.0 ==> later multiply by image width, height)
'''
def get_keypoint(humans, hnum, peaks):
    #check invalid human index
    kpoint = []
    human = humans[0][hnum]
    C = human.shape[0]
    for j in range(C):
        k = int(human[j])
        if k >= 0:
            peak = peaks[0][j][k]   # peak[1]:width, peak[0]:height
            peak = (j, float(peak[0]), float(peak[1]))
            kpoint.append(peak)
            print('index:%d : success [%5.3f, %5.3f]'%(j, peak[1], peak[2]) )
        else:
            peak = (j, None, None)
            kpoint.append(peak)
            print('index:%d : None'%(j) )
    return kpoint

def preprocess(image):
    global device
    device = torch.device('cuda')
    image = cv2.cvtColor(image, cv2.COLOR_BGR2RGB)
    image = PIL.Image.fromarray(image)
    image = transforms.functional.to_tensor(image).to(device)
    image.sub_(mean[:, None, None]).div_(std[:, None, None])
    return image[None, ...]

'''
Draw to inference (small)image
'''
def execute(img):
    start = time.time()
    data = preprocess(img)
    cmap, paf = model_trt(data)
    cmap, paf = cmap.detach().cpu(), paf.detach().cpu()
    end = time.time()
    counts, objects, peaks = parse_objects(cmap, paf)#, cmap_threshold=0.15, link_threshold=0.15)
    for i in range(counts[0]):
        print("Human index:%d "%( i ))
        get_keypoint(objects, i, peaks)
    print("Human count:%d len:%d "%(counts[0], len(counts)))
    print('===== Net FPS :%f ====='%( 1 / (end - start)))
    draw_objects(img, counts, objects, peaks)
    return img

'''
Draw to original image
'''
def execute_2(img, org):
    start = time.time()
    data = preprocess(img)
    cmap, paf = model_trt(data)
    cmap, paf = cmap.detach().cpu(), paf.detach().cpu()
    end = time.time()
    counts, objects, peaks = parse_objects(cmap, paf)#, cmap_threshold=0.15, link_threshold=0.15)
    for i in range(counts[0]):
        print("Human index:%d "%( i ))
        kpoint = get_keypoint(objects, i, peaks)
        #print(kpoint)
        org = draw_keypoints(org, kpoint)
    print("Human count:%d len:%d "%(counts[0], len(counts)))
    print('===== Net FPS :%f ====='%( 1 / (end - start)))
    return org


parser = argparse.ArgumentParser(description='TensorRT pose estimation run')
parser.add_argument('--image', type=str, default='/home/spypiggy/src/test_images/humans_7.jpg')
parser.add_argument('--model', type=str, default='resnet', help = 'resnet or densenet' )
args = parser.parse_args()

with open('human_pose.json', 'r') as f:
    human_pose = json.load(f)

topology = trt_pose.coco.coco_category_to_topology(human_pose)
num_parts = len(human_pose['keypoints'])
num_links = len(human_pose['skeleton'])


if 'resnet' in args.model:
    print('------ model = resnet--------')
    MODEL_WEIGHTS = 'resnet18_baseline_att_224x224_A_epoch_249.pth'
    OPTIMIZED_MODEL = 'resnet18_baseline_att_224x224_A_epoch_249_trt.pth'
    model = trt_pose.models.resnet18_baseline_att(num_parts, 2 * num_links).cuda().eval()
    WIDTH = 224
    HEIGHT = 224

else:
    print('------ model = densenet--------')
    MODEL_WEIGHTS = 'densenet121_baseline_att_256x256_B_epoch_160.pth'
    OPTIMIZED_MODEL = 'densenet121_baseline_att_256x256_B_epoch_160_trt.pth'
    model = trt_pose.models.densenet121_baseline_att(num_parts, 2 * num_links).cuda().eval()
    WIDTH = 256
    HEIGHT = 256

data = torch.zeros((1, 3, HEIGHT, WIDTH)).cuda()
if os.path.exists(OPTIMIZED_MODEL) == False:
    model.load_state_dict(torch.load(MODEL_WEIGHTS))
    model_trt = torch2trt.torch2trt(model, [data], fp16_mode=True, max_workspace_size=1<<25)
    torch.save(model_trt.state_dict(), OPTIMIZED_MODEL)

model_trt = TRTModule()
model_trt.load_state_dict(torch.load(OPTIMIZED_MODEL))

t0 = time.time()
torch.cuda.current_stream().synchronize()
for i in range(50):
    y = model_trt(data)
torch.cuda.current_stream().synchronize()
t1 = time.time()

print(50.0 / (t1 - t0))

mean = torch.Tensor([0.485, 0.456, 0.406]).cuda()
std = torch.Tensor([0.229, 0.224, 0.225]).cuda()
device = torch.device('cuda')

src = cv2.imread(args.image, cv2.IMREAD_COLOR)
pilimg = cv2.cvtColor(src, cv2.COLOR_BGR2RGB)
pilimg = PIL.Image.fromarray(pilimg)
orgimg = pilimg.copy()

image = cv2.resize(src, dsize=(WIDTH, HEIGHT), interpolation=cv2.INTER_AREA)
parse_objects = ParseObjects(topology)
draw_objects = DrawObjects(topology)
for x in range(1):
    img = image.copy()
    #img = execute(img)
    pilimg = execute_2(img, orgimg)
    #cv2.imshow('key',img)
dir, filename = os.path.split(args.image)
name, ext = os.path.splitext(filename)
pilimg.save('/home/spypiggy/src/test_images/result/%s_%s.png'%(args.model, name))
<detect_image.py>
Run the code.
root@spypiggy-jesonnano:/usr/local/src/trt_pose/tasks/human_pose# python3 detect_image.py --model=densenet

The result shows that there are 3 humans in the picture, and shows each person's keypoint informations.
Be Careful : The above key point output values are based on image size 1 and are Y and X coordinates. Therefore, [0.374, 0.505] of the last line has a Y coordinate of 0.374 and an X coordinate of 0.5.5. To apply this value to the original image, multiply it by the height and width of the image.
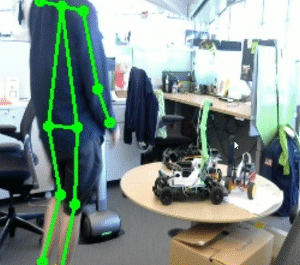
This is the test input image.

This is the output image.

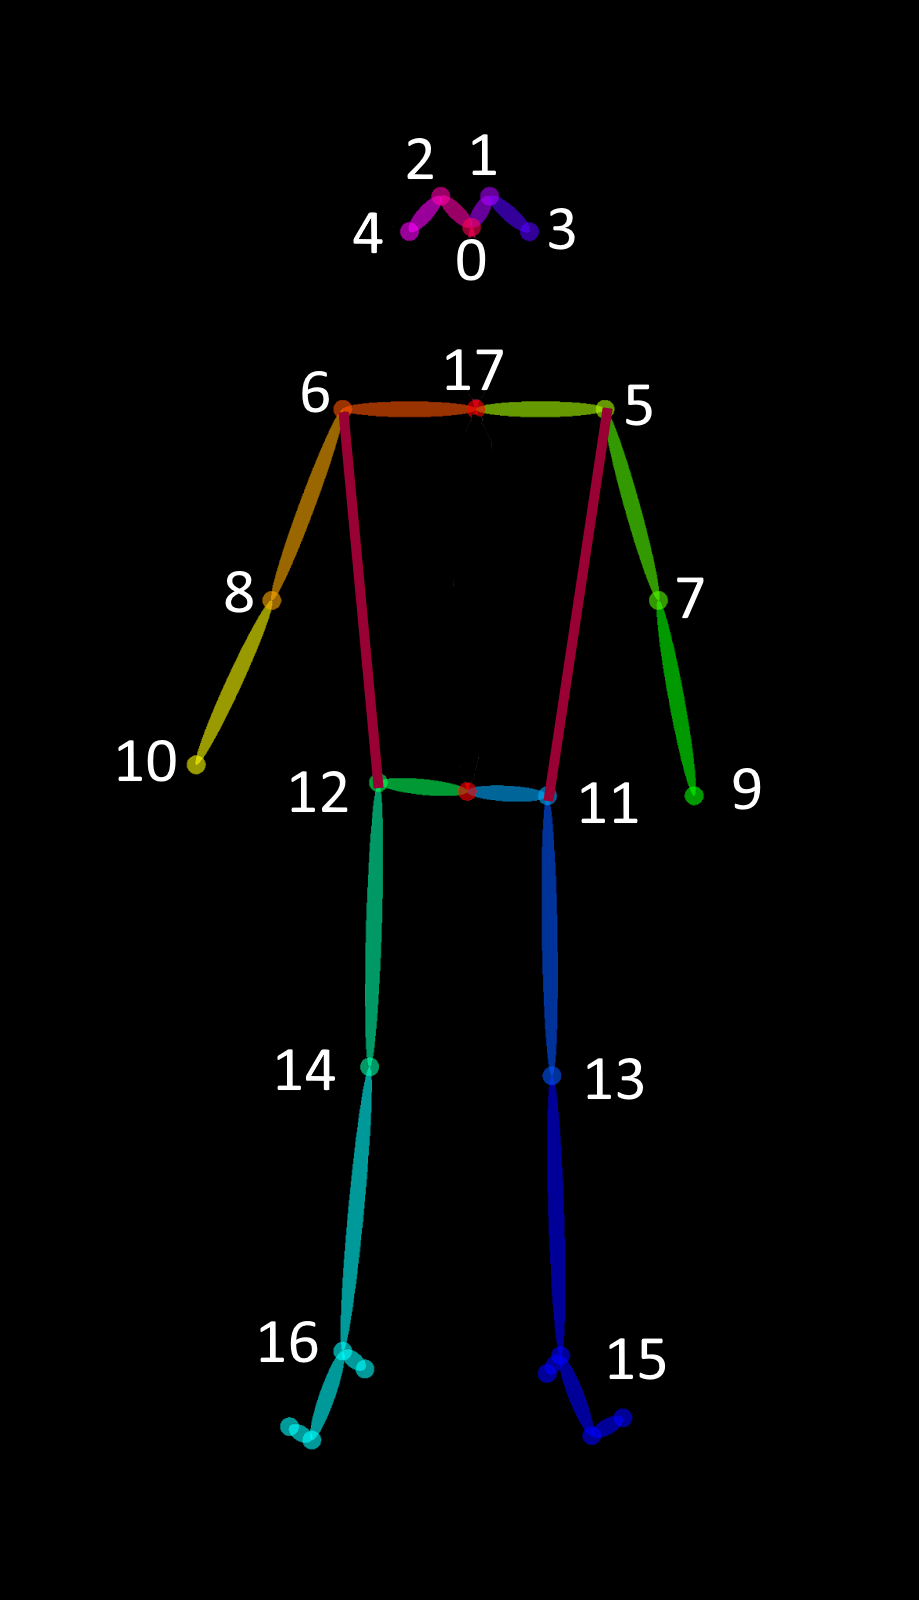
What is the index?
The index shows the keypoint name index. There's a file named "human_pose.json" in the "trt_pose/tasks/human_pose" directory.{ "supercategory": "person", "id": 1, "name": "person", "keypoints": [ "nose", "left_eye", "right_eye", "left_ear", "right_ear", "left_shoulder", "right_shoulder", "left_elbow", "right_elbow", "left_wrist", "right_wrist", "left_hip", "right_hip", "left_knee", "right_knee", "left_ankle", "right_ankle", "neck" ], "skeleton": [ .........
Yes. index 0 indicates "nose", and index 17 indicates "neck". If no particular keypoint is found, it returns None for the keypoint coordinates.
<index position>
What is the floating point value?
If a particular keypoint is found, it returns a coordinate value between 0.0 and 1.0. If you use a resnet18_baseline_att_224x224_A model, input inference image size is 224X224, if you use a densenet121_baseline_att_256x256, input inference image size is 256X256. Multiply this coordinate by the image size to calculate the exact location in the input image.Get Keypoints from video
import json
import trt_pose.coco
import trt_pose.models
import torch
import torch2trt
from torch2trt import TRTModule
import time, sys
import cv2
import torchvision.transforms as transforms
import PIL.Image
from trt_pose.draw_objects import DrawObjects
from trt_pose.parse_objects import ParseObjects
import argparse
import os.path


'''
hnum: 0 based human index
kpoint : keypoints (float type range : 0.0 ~ 1.0 ==> later multiply by image width, height
'''
def get_keypoint(humans, hnum, peaks):
    #check invalid human index
    kpoint = []
    human = humans[0][hnum]
    C = human.shape[0]
    for j in range(C):
        k = int(human[j])
        if k >= 0:
            peak = peaks[0][j][k]   # peak[1]:width, peak[0]:height
            peak = (j, float(peak[0]), float(peak[1]))
            kpoint.append(peak)
            #print('index:%d : success [%5.3f, %5.3f]'%(j, peak[1], peak[2]) )
        else:
            peak = (j, None, None)
            kpoint.append(peak)
            #print('index:%d : None %d'%(j, k) )
    return kpoint


parser = argparse.ArgumentParser(description='TensorRT pose estimation run')
parser.add_argument('--model', type=str, default='resnet', help = 'resnet or densenet' )
args = parser.parse_args()

with open('human_pose.json', 'r') as f:
    human_pose = json.load(f)

topology = trt_pose.coco.coco_category_to_topology(human_pose)

num_parts = len(human_pose['keypoints'])
num_links = len(human_pose['skeleton'])


if 'resnet' in args.model:
    print('------ model = resnet--------')
    MODEL_WEIGHTS = 'resnet18_baseline_att_224x224_A_epoch_249.pth'
    OPTIMIZED_MODEL = 'resnet18_baseline_att_224x224_A_epoch_249_trt.pth'
    model = trt_pose.models.resnet18_baseline_att(num_parts, 2 * num_links).cuda().eval()
    WIDTH = 224
    HEIGHT = 224

else:
    print('------ model = densenet--------')
    MODEL_WEIGHTS = 'densenet121_baseline_att_256x256_B_epoch_160.pth'
    OPTIMIZED_MODEL = 'densenet121_baseline_att_256x256_B_epoch_160_trt.pth'
    model = trt_pose.models.densenet121_baseline_att(num_parts, 2 * num_links).cuda().eval()
    WIDTH = 256
    HEIGHT = 256

data = torch.zeros((1, 3, HEIGHT, WIDTH)).cuda()
if os.path.exists(OPTIMIZED_MODEL) == False:
    model.load_state_dict(torch.load(MODEL_WEIGHTS))
    model_trt = torch2trt.torch2trt(model, [data], fp16_mode=True, max_workspace_size=1<<25)
    torch.save(model_trt.state_dict(), OPTIMIZED_MODEL)

model_trt = TRTModule()
model_trt.load_state_dict(torch.load(OPTIMIZED_MODEL))

t0 = time.time()
torch.cuda.current_stream().synchronize()
for i in range(50):
    y = model_trt(data)
torch.cuda.current_stream().synchronize()
t1 = time.time()

print(50.0 / (t1 - t0))

mean = torch.Tensor([0.485, 0.456, 0.406]).cuda()
std = torch.Tensor([0.229, 0.224, 0.225]).cuda()
device = torch.device('cuda')

def preprocess(image):
    global device
    device = torch.device('cuda')
    image = cv2.cvtColor(image, cv2.COLOR_BGR2RGB)
    image = PIL.Image.fromarray(image)
    image = transforms.functional.to_tensor(image).to(device)
    image.sub_(mean[:, None, None]).div_(std[:, None, None])
    return image[None, ...]

def execute(img, src, t):
    color = (0, 255, 0)
    data = preprocess(img)
    cmap, paf = model_trt(data)
    cmap, paf = cmap.detach().cpu(), paf.detach().cpu()
    counts, objects, peaks = parse_objects(cmap, paf)#, cmap_threshold=0.15, link_threshold=0.15)
    fps = 1.0 / (time.time() - t)
    for i in range(counts[0]):
        keypoints = get_keypoint(objects, i, peaks)
        for j in range(len(keypoints)):
            if keypoints[j][1]:
                x = round(keypoints[j][2] * WIDTH * X_compress)
                y = round(keypoints[j][1] * HEIGHT * Y_compress)
                cv2.circle(src, (x, y), 3, color, 2)
                cv2.putText(src , "%d" % int(keypoints[j][0]), (x + 5, y),  cv2.FONT_HERSHEY_SIMPLEX, 1, (0, 255, 255), 1)
                cv2.circle(src, (x, y), 3, color, 2)
    print("FPS:%f "%(fps))
    #draw_objects(img, counts, objects, peaks)

    cv2.putText(src , "FPS: %f" % (fps), (20, 20),  cv2.FONT_HERSHEY_SIMPLEX, 1, (0, 255, 0), 1)
    out_video.write(src)


cap = cv2.VideoCapture(0)
cap.set(cv2.CAP_PROP_FRAME_WIDTH, 640)
cap.set(cv2.CAP_PROP_FRAME_HEIGHT, 480)

ret_val, img = cap.read()
fourcc = cv2.VideoWriter_fourcc('m', 'p', '4', 'v')
out_video = cv2.VideoWriter('/tmp/output.mp4', fourcc, cap.get(cv2.CAP_PROP_FPS), (640, 480))
count = 0

X_compress = 640.0 / WIDTH * 1.0
Y_compress = 480.0 / HEIGHT * 1.0

if cap is None:
    print("Camera Open Error")
    sys.exit(0)

parse_objects = ParseObjects(topology)
draw_objects = DrawObjects(topology)

while cap.isOpened() and count < 500:
    t = time.time()
    ret_val, dst = cap.read()
    if ret_val == False:
        print("Camera read Error")
        break

    img = cv2.resize(dst, dsize=(WIDTH, HEIGHT), interpolation=cv2.INTER_AREA)
    execute(img, dst, t)
    count += 1


cv2.destroyAllWindows()
out_video.release()
cap.release()
<detect_video.py>
Run the code.
root@spypiggy-jesonnano:/usr/local/src/trt_pose/tasks/human_pose# python3 detect_video.py --model=resnet
The output FPS is 15 ~ 16 with resnet model. The densenet model's FPS is 9 ~ 10. This is the best pose estimation model I've ever experienced with the Jetson Nano.

<webcam captured image with densenet model>
Wrapping up
I've tested human pose estimation with several models so far, but the model presented in this article is the best. If you are using the Jetson series, I recommend using this model for human pose estimation.
If you are interested in trt_pose of Jetson Xavier NX, see my other post(Xavier NX - NVIDIA AI IOT - Human Pose estimation using TensorRT)
If you are interested in debugging trt_pose , see my other post(Xavier NX - NVIDIA AI IOT - Fast debugging trt_pose(Human Pose estimation using TensorRT) using VSCode)
Hi, thank for the detailed explanation! Do you know how to perform training with this pose estimation repo? Thank you!
답글삭제Hi, thank for the detailed explanation! Do you know how to perform training with this pose estimation repo? Thank you!
답글삭제No, I don't know the training.
삭제I'm just interested in AI edge computing.
작성자가 댓글을 삭제했습니다.
답글삭제I get the following error when trying to run your code, any help would be greatly appreciated. Thank you
답글삭제------ model = resnet--------
12.615812525168135
[ WARN:0] global /home/ahmad/opencv/modules/videoio/src/cap_gstreamer.cpp (1757) handleMessage OpenCV | GStreamer warning: Embedded video playback halted; module v4l2src0 reported: Internal data stream error.
[ WARN:0] global /home/ahmad/opencv/modules/videoio/src/cap_gstreamer.cpp (886) open OpenCV | GStreamer warning: unable to start pipeline
[ WARN:0] global /home/ahmad/opencv/modules/videoio/src/cap_gstreamer.cpp (480) isPipelinePlaying OpenCV | GStreamer warning: GStreamer: pipeline have not been created
VIDEOIO ERROR: V4L: Unable to get camera FPS
[ERROR:0] global /home/ahmad/opencv/modules/videoio/src/cap.cpp (392) open VIDEOIO(GSTREAMER): raised OpenCV exception:
OpenCV(4.1.1) /home/ahmad/opencv/modules/videoio/src/cap_gstreamer.cpp:1392: error: (-215:Assertion failed) fps > 0 in function 'open'
Did you build the source code to implement OpenCV? Errors related to Gstreamer are not easy to find. If you built OpenCV using source code, please refer to https://spyjetson.blogspot.com/2019/09/jetsonnano-opencv-411-build.html. Starting with Jetpack 4.3, OpenCV 4.1.1 is installed and provided as standard. I recommend that you test it again in this environment.
답글삭제Thanks for the quick response. Yes I started with Jetpack 4.3. Do you have a YouTube video walkthrough for this project?
답글삭제No, I don't have a Youtube channel. I'm going to test the code on the Jetpack 4.3 soon. And I'll share the result with you.
삭제I installed a new Jetpack 4.3 to my SD card and installed required S/W.(In my old post, I used Pytotch 1.3, but 1.4 is the newest version. So I installed Pytorch 1.4. I updated the post)
삭제Then I tested the source codes. I got no errors. Two sample codes works well.
If you modified the above code and use cv2.imshow function and works with remote SSH, perhaps an error occurs.
If you still have troubles, pls follow my updated posts for installing required S/W.
Thanks, we were able to get it running! We are trying to build on this to identify certain arm/body movements. For example, a right arm in the form of a 90 degree angle would be detected and some action would be done. Any guidance on how we can do this?
삭제I posted an article calculating the angles of body elements.
삭제Pls see my other post https://spyjetson.blogspot.com/2019/09/jetsonnano-human-pose-estimation-using.html .
Hi,
답글삭제I am trying to run the scripts you provided but I am getting some errors. Are you able to help me?
When running the image detection I get this:
sudo python3 imagepose.py --image="/home/yusuf/Desktop/trt_pose/tasks/human_pose/humans_7.jpg" --model=densenet
------ model = densenet--------
Traceback (most recent call last):
File "imagepose.py", line 189, in
model_trt.load_state_dict(torch.load(OPTIMIZED_MODEL))
File "/home/yusuf/.local/lib/python3.6/site-packages/torch/serialization.py", line 580, in load
return _legacy_load(opened_file, map_location, pickle_module, **pickle_load_args)
File "/home/yusuf/.local/lib/python3.6/site-packages/torch/serialization.py", line 750, in _legacy_load
magic_number = pickle_module.load(f, **pickle_load_args)
EOFError: Ran out of input
When I run the video script, I have put a rtsp stream in videoCapture command, I get the following:
sudo python3 pose.py --model=resnet
------ model = resnet--------
10.43325879840057
[mpeg4 @ 0x8d456a40] timebase 1/180000 not supported by MPEG 4 standard, the maximum admitted value for the timebase denominator is 65535
Could not open codec 'mpeg4': Unspecified error
(python3:11240): GStreamer-CRITICAL **: 14:09:09.238: gst_element_make_from_uri: assertion 'gst_uri_is_valid (uri)' failed
[ WARN:0] global /home/nvidia/host/build_opencv/nv_opencv/modules/videoio/src/cap_gstreamer.cpp (1578) open OpenCV | GStreamer warning: cannot link elements
FPS:1.639794
FPS:11.211899
FPS:11.327354
FPS:12.698891
FPS:11.814142
FPS:11.931534
FPS:12.863122
FPS:12.060881
FPS:11.799983
FPS:11.527310
FPS:11.725890
FPS:11.484793
FPS:11.461256
FPS:11.368434
FPS:10.250536
FPS:12.350064
FPS:12.299182
FPS:12.202286
FPS:12.305858
FPS:11.702694
FPS:12.276323
FPS:11.430241
FPS:11.881376
FPS:11.498080
FPS:11.719468
FPS:12.041905
FPS:11.002348
FPS:11.516833
FPS:11.950912
FPS:11.712432
FPS:11.380124
FPS:11.752569
FPS:11.287330
FPS:11.376420
FPS:12.228220
FPS:12.093605
FPS:12.204487
FPS:11.931330
FPS:10.575200
FPS:11.191824
FPS:11.480393
FPS:11.527690
FPS:11.590061
FPS:11.062620
FPS:12.181696
FPS:11.310584
FPS:11.654535
FPS:12.211096
FPS:12.110505
FPS:11.391003
FPS:12.075395
FPS:12.046644
FPS:11.445306
FPS:11.597785
FPS:11.618571
FPS:12.026782
FPS:11.750693
FPS:11.907349
FPS:12.047059
FPS:11.271042
FPS:12.103132
FPS:11.214297
FPS:11.124442
FPS:10.811288
FPS:11.607028
FPS:12.319086
FPS:12.151803
FPS:11.843867
FPS:11.440592
FPS:11.780595
FPS:11.719272
FPS:12.162303
FPS:11.648418
FPS:11.588716
FPS:11.949107
FPS:11.665751
FPS:11.808222
[h264 @ 0x8d3a7440] cbp too large (4099) at 10 4
[h264 @ 0x8d3a7440] error while decoding MB 10 4
FPS:0.031468
Camera read Error
Are you able to help me? I do not have a webcam, I am running on Jetson nano and I have a CSI Camera or a IPcamera app on phone with RTSP stream.
Kind Regards,
Yusuf
In my example, the python file name is detect_image2.py.
삭제And this is my Jetson's information.(I used Xavier NX, but I'm sure that the result is the same. In my execution environment, the python files and model files are in the same directory.
(python) spypiggy@XavierNX:~/src/trt_pose/tasks/human_pose$ pwd
/home/spypiggy/src/trt_pose/tasks/human_pose
(python) spypiggy@XavierNX:~/src/trt_pose/tasks/human_pose$ ls -al
total 307328
drwxrwxr-x 3 spypiggy spypiggy 4096 Aug 2 01:56 .
drwxrwxr-x 3 spypiggy spypiggy 4096 Aug 1 08:37 ..
-rw-rw-r-- 1 spypiggy spypiggy 87573944 Aug 1 08:58 densenet121_baseline_att_256x256_B_epoch_160.pth
-rw-rw-r-- 1 spypiggy spypiggy 66055471 Aug 1 09:08 densenet121_baseline_att_256x256_B_epoch_160_trt.pth
-rw-rw-r-- 1 spypiggy spypiggy 9960 Aug 2 00:54 detect_image2.py
-rw-rw-r-- 1 spypiggy spypiggy 10483 Aug 2 01:40 detect_video2.py
-rw-rw-r-- 1 spypiggy spypiggy 182 Aug 1 08:37 download_coco.sh
-rw-rw-r-- 1 spypiggy spypiggy 12027 Aug 1 08:37 eval.ipynb
drwxrwxr-x 2 spypiggy spypiggy 4096 Aug 1 08:37 experiments
-rw-rw-r-- 1 spypiggy spypiggy 510 Aug 1 08:37 human_pose.json
-rw-rw-r-- 1 spypiggy spypiggy 10177 Aug 1 08:37 live_demo.ipynb
-rw-rw-r-- 1 spypiggy spypiggy 2521 Aug 1 08:37 preprocess_coco_person.py
-rw-rw-r-- 1 spypiggy spypiggy 85195117 Aug 1 08:53 resnet18_baseline_att_224x224_A_epoch_249.pth
-rw-rw-r-- 1 spypiggy spypiggy 75797551 Aug 2 01:21 resnet18_baseline_att_224x224_A_epoch_249_trt.pth
And when I ran the python, I can get the success result as below. Please double check that the model file is in the same directory.
(python) spypiggy@XavierNX:~/src/trt_pose/tasks/human_pose$ python3 detect_image2.py --image="/home/spypiggy/src/test_images/humans_7.jpg" --model=densenet
.....
index:9 : None
index:10 : None
index:11 : success [0.580, 0.568]
index:12 : success [0.575, 0.447]
index:13 : success [0.716, 0.551]
index:14 : success [0.712, 0.468]
index:15 : success [0.854, 0.538]
index:16 : success [0.856, 0.475]
index:17 : success [0.375, 0.505]
Human count:3 len:1
===== Net FPS :40.797051 =====
Hi,
답글삭제I am trying to run these two scripts to test but I am getting errors. When I run the image detection script I get the following error:
sudo python3 imagepose.py --image="/home/yusuf/Desktop/trt_pose/tasks/human_pose/humans_7.jpg" --model=densenet
------ model = densenet--------
Traceback (most recent call last):
File "imagepose.py", line 189, in
model_trt.load_state_dict(torch.load(OPTIMIZED_MODEL))
File "/home/yusuf/.local/lib/python3.6/site-packages/torch/serialization.py", line 580, in load
return _legacy_load(opened_file, map_location, pickle_module, **pickle_load_args)
File "/home/yusuf/.local/lib/python3.6/site-packages/torch/serialization.py", line 750, in _legacy_load
magic_number = pickle_module.load(f, **pickle_load_args)
EOFError: Ran out of input
When I run the video script on CSI camera, it keeps showing the FPS but no display shows to show the stream and pose estimation?
Kind Regards,
Yusuf
When using CSI camera, cv2.VideoCapture(0) function parameter should be changed.
삭제Please see my blog(https://spyjetson.blogspot.com/2020/02/camera-csi-camera-raspberry-pi-camera-v2.html) about CSI camera.
Hi! Do you know how to run pose estimation and draw the keypoints like you did in the image script but for local video files? I've tried replacing the cap in the camera one with the local video path but with no success. Thanks!
답글삭제Hi Kar.
삭제With OpenCV, processing image files and video is almost the same. When processing video files, OpenCV reads frame by frame and treats them as one image.
Therefore, video processing is also easy to understand if you have fully understood the Python script for image processing.
And if you analyze the sample code of detect_video.py well, you will get help. And I have confirmed that Detect_video.py runs well without any problems.
Good luck!
Thank you @spypiggy you helped me a lot, great quality material and guide!
답글삭제Hi, Thank you for offering these scripts!! I would like to ask you how can I get the confidence/score value for each keypoint (like in openpose for example). Thanks in advance.
답글삭제Hi John.
삭제Sorry for the late reply.
It seems that the trt_pose does not offer the confidence value of key points.
But you can adjust keypoint extraction using thresholds.
I wrote a new article about debugging trt_pose. And in this article, I've added some helpful information to your question. Please take a look.
https://spyjetson.blogspot.com/2021/01/xavier-nx-nvidia-ai-iot-fast-debuggiing.html
Hello spypiggy,
답글삭제https://github.com/hafizas101/Real-time-human-pose-estimation-and-classification
I saw the article before.
I wanna use your methods for finishing pose classification.
Can you please share the pose classification knowlege or other methods?
Are you hafizas101?
삭제Hello, sorry that I first time use the response of blog .
삭제I'm not hafizas101, the following is my github.
https://github.com/c7934597.
I'm implementing your article and the pose classification of hafizas101. Because I need to inference somebody for taking pictures. Maybe inferencing whether catching thing?
My methods is using key points of pose, and then counting their degree. Is that good method? I first time developing pose estimation , therefore, I need tutorials about that. Thank you so much.
Hi Ming,
삭제I don't know hafizas101's github contents.
When it comes to solving all problems, I believe machine learning isn't the best solution or the best option. In gesture recognition, a method of classifying key point data of a specific motion by machine learning may be possible. However, I don't think it's a bad way to hardcode by calculating the angle and position of keypoints. Rather, for simple operations, this could be a good way to produce faster and more accurate results.
Hi
답글삭제Do you know an human body part segmentation implementation for jetson?
First, I recommend Pytorch detestron2(https://github.com/facebookresearch/detectron2).
삭제I've also written a blog about detectron2(https://spyjetson.blogspot.com/2020/06/jetson-nano-detectron2-segmentation.html).
And there're several githubs. In the github, search keyword "body segmentation"
Pls see "https://github.com/kevinlin311tw/CDCL-human-part-segmentation"
HI i have a problem in detect_video.py . i can't play output.mp4... do you know why?
답글삭제The detect_video.py simply records 500 frames on the /tmp/output.mp4.
삭제You have to wait until the program ends.
If you have done this, I dont't know the reason.
Hi! I found your amazing codes by someone's comment on my issue of trt-pose.
답글삭제I want to know if I can classify human behaviors(like sitting, lying, walking and falling) by measuring the angle between keypoints.
Is there any way to do that on your second code? I'd very appreciate it if you could answer my question!
The code for calculating the angle between keypoints can be found on my blog.
삭제Of course, it is up to you to estimate the posture using this angle.
Thank you very much!
삭제Hi, thank you for you post. This will be very helpful for my project.
답글삭제However, I got error while installing torch2trt
when I typed 'python3 setup.py install'
I got error like this
error: command 'aarch64-linux-gnu-gcc' failed with exit status 1
How can solve this problem?
Thank you
Hi, Thank you your article! this is awesome!
답글삭제Howmever, when U try to run the example code (detect_image.py),
it shows ' -------model = densenet --------
but after that,the Jetson suddenly stop and dosen't work anything.
the screen freezes.
Do you know how can I solve this problem?
I'm using jetpang 4.6, and pythorch 1.8
Is this because of version problem??
I haven't tested it yet with jetpank 4.6 and python 1.8.
삭제Most of the reasons for a sudden system hang is due to insufficient memory on the Jetson Nano. If you change your Ubuntu desktop to LXDE, you can free up about 1 GB of additional memory. First, use this method to increase the available memory, and then test again. I know LXDE is easy to install with JetPack 4.6.
It is also introduced at https://spyjetson.blogspot.com/2019/09/jetson-nano-useful-tips-before-you.html.