In my previous post, "OpenCV camera control on Raspberry Pi BullsEye OS", I described the change of the Raspberry Pi's camera stack, which caused a lot of confusion. I also explained that OpenCV using GStreamer can be built and used successfully. OpenCV without GStreamer cannot be used with the new camera stack, libcamera. Therefore, camera control is not possible.
This article will take a look at which library is best to use for controlling the Raspberry Pi CSI camera from the point of view of a Python developer.
Choice 1. Restore to legacy mode
Legacy mode restoration is to restore the camera stack back to the Legacy stack as before BullsEye. Then there will be the following advantages.
Existing camera control programs (raspistill, raspivid) can be used as they are.
Python developers can use the existing Picamera package as is.
In other words, the developer can use the Raspberry Pi CSI camera without any changes as in the previous Buster version. The easiest and safest way. However, it is very likely that legacy mode restore will not continue to be supported. The legacy mode camera stack will probably disappear at some point in the future. Support for the current legacy mode restore feature is due to the sudden change of APIs. This is a way to reduce confusion for users and to guarantee the use of existing programs to some extent.
If you plan to use the current version without using the newly updated Raspberry Pi OS in the future, there is no problem, but if you plan to continuously improve the program in the new OS, this method is difficult to recommend.
Choice 2. Developing for the new camera stack(libcamera)
If you decide to use the new libcamera stack, let's figure out which python package to use. And let's look at the pros and cons of the package.
Picamera
Existing legacy camera stacks used the Picera package. However, the Piccamera package is no longer available in the libcamera stack.
If you run the Python code above on the newly installed BullsEye (32-bit or 64-bit), an error occurs.
<picamera package error>
The reason this error message occurs is that as the camera stack is changed to libcamera in BullsEye, the picamera python package can no longer be supported, so it is no longer installed in the download image. If you change the camera stack to the legacy stack and then go back to libcamera, the error message may be different. In this case, the picamera package was installed while reverting to the legacy camera stack, but the error message is different because it is not available in the libcamera stack.
The conclusion is that the pycamera package is no longer available in the libcamera camera stack. So the Picamera package is no longer a consideration
Picamera2
Since the Picamera package was developed for the Legacy camera stack, a new Picamera package for the new libcamera camera stack is needed. The Raspberry Pi Foundation is currently developing this package under the name Picamera2.
The following is to save as a jpg file among the Picamera 2 preview version examples.
#!/usr/bin/python3# Capture a JPEG while still running in the preview mode. When you# capture to a file, the return value is the metadata for that image.frompicamera2.picamera2import*importtimepicam2=Picamera2()preview_config=picam2.preview_configuration(main={"size":(800,600)})picam2.configure(preview_config)picam2.start_preview(Preview.QTGL)picam2.start()time.sleep(2)metadata=picam2.capture_file("test.jpg")print(metadata)picam2.close()
<Picamera2 example>
Perhaps sooner or later, an official version of Picamera2 will be released, and the Raspberry Pi Foundation will recommend Python developers to use this package. But I wonder if I need to use Picamera2. This package is only available for Raspberry Pi CSI camera. We use the CSI camera on the Raspberry Pi as well, but we can also use the webcam. In particular, except for the CM (Computing Module), only one CSI camera can be used. Of course, if you use 3rd party products provided by Arducam, you can use multiple CSI cameras. But the easiest way is to use a CSI camera and webcam together. In this case, it is most convenient to control the CSI camera and webcam in one package.
Therefore I do not recommend the use of the picamera2 package. In fact, even before BullsEye, I seldom used the picamera package.
My conclusion is OpenCV.
OpenCV
If you properly use an image processing package such as Pillow together with OpenCV, you can have the following advantages.
CSI cameras and webcams can be handled with the same API.
Not only camera control, but also video control and photo control are possible.
In addition to video and image recording, image format conversion and processing are possible.
It has versatility that can be used not only on Raspberry Pi, but also on Linux, Windows, Mac OS and even smartphones.
OpenCV is used for vision processing in most machine learning frameworks such as TensorFlow, Caffe, and PyTorch.
To use OpenCV with BullsEye's libcamera camera stack, you must change the build option to use GStreamer and then build a new one. Building OpenCV using GStreamer is described in detail in the previous article.
Let's implement some important functions of picamera to OpenCV.
Preview
The program opens the CSI camera and then shows a preview window for 5 seconds. The preview function is a basic function that is used a lot in camera control.
Next, the video is shot for 5 seconds. The Picamera package saves it as an h264 file in raw format, while OpenCV saves it in a video format with a header including video information.
Picamera implementation
frompicameraimportPiCamera,PiCameraValueErrorfromtimeimportsleepf_res=Nonedefset_resolution(ver,index):globalf_res,camerares={"v1":[(2592,1944),(1920,1280),(1296,972),(1296,730),(1024,768),(800,600),(640,480)],"v2":[(3280,2464),(2592,1944),(1920,1280),(1296,972),(1296,730),(1024,768),(800,600),(640,480)]}f_res=res[ver][index]print("final resolution",f_res)camera.resolution=f_rescamera=PiCamera()set_resolution("v2",3)camera.start_preview(fullscreen=False,window=(0,0,1280,960))try:camera.start_recording('/home/pi/src/legacy/picamera.h264')sleep(5)camera.stop_recording()exceptPiCameraValueErroraserr:print("Picamera Err:",err)print("Please use another resolution")camera.stop_preview()
I have changed some frequently used functions in Picamera to OpenCV. Most camera control is possible with OpenCV using GStreamer.
Wrapping up
I'm not saying you shouldn't use picamera2. It is recommended to use OpenCV first for camera control. If you need to fine tune your camera , you may need picamera2. In other words, use picamera2 only when it is difficult to process with OpenCV. By the way, I haven't experienced anything like this yet.
OpenCV includes numerous functions such as camera control, image processing, and machine learning support. It provides rich features that cannot be compared with the picamera package, which can only control the CSI camera of the Raspberry Pi, and can be used on almost all platforms including Windows, Linux, Mac OS, and Android. In addition, various development languages such as Python, C++, and Java are supported. There are good reasons to consider using OpenCV over Picamera.
Fall 2021 Raspberry Pi OS moved from Buster to BullsEye. This was done in line with the upgrade of the Debian OS, which is the basis of the Raspberry Pi OS. And finally, in February 2022, the official version of the Raspberry Pi OS 64-bit was released. However, when the Raspberry Pi OS changed to BullsEye, the camera control part changed too radically. In the article introducing the 64-bit version, I mentioned the precautions for changing the camera control part, but let's take a closer look here and see how to use OpenCV in a new way. If you are using a USB webcam, this article is not of much help. This article is for users who use CSI cameras.
CSI Camera Control on Raspberry Pi OS BullsEye
The Raspberry Pi OS refers to the CSI camera as a Legacy camera. And this camera control was developed for SoC of Broadcom, the chipset supplier of Raspberry Pi. So it's a fairly closed structure. As the Raspberry Pi Foundation changed the OS to BullsEye, the camera control was replaced with an open libcamera, causing compatibility issues with existing software. I wonder if maybe they're trying to change their chipset vendor from Broadcom to something else. The following is the official page for the Raspberry Pi camera. https://www.raspberrypi.com/documentation/accessories/camera.html. A verbose account of why we're moving to the open source libcamera.
The PiCamera module, which was used for existing Python development, can no longer be used right now. This module is of course not available in the new libcamera as it uses the old closed legacy camera control. The Raspberry Pi Foundation is making PiCamera2 for libcamera. You can download the beta version of picamera2 developed up to now (2022.03) from github (https://github.com/raspberrypi/picamera2) and test it. However, since it is impossible to keep the API 100% the same, it is unavoidable to modify an existing Python program for libcamera. Since there are libcamera programs corresponding to the previously used raspicam program, there is no problem with previewing, taking pictures, and taking videos in the command window.
The following are libcamera programs that can replace the existing raspistill and raspivid.
libcamera-hello A simple "hello world" application which starts a camera preview stream and displays it on the screen.
libcamera-jpeg A simple application to run a preview window and then capture high resolution still images.
libcamera-still A more complex still image capture application which emulates more of the features of raspistill.
libcamera-vid A video capture application.
libcamera-raw A basic application for capturing raw (unprocessed Bayer) frames directly from the sensor.
libcamera-detect This application is not built by default, but users can build it if they have TensorFlow Lite installed on their Raspberry Pi. It captures JPEG images when certain objects are detected.
But for developers, it's a completely different story. In a situation that made all existing programs unusable, the Raspberry Pi Foundation had no choice but to improve raspi-config so that BullsEye can use the existing Legacy camera. Note that libcamera and legacy cameras cannot be used at the same time. Enabling Interface Options/Legacy Camera in raspi-config will revert to legacy legacy camera mode. Disable camera, not enable option as before. Therefore, this option should not be enabled when using libcamera.
<YouTube explaining how to return to Legacy mode>
If you are using a camera solution, we recommend that you proceed with caution when upgrading to BullsEye OS.
OpenCV on BullsEye
BullsEye exists in both 32-bit and 64-bit OS, but in the test below, we will proceed with the 64-bit standard. In the introduction of 64-bit OS, I mentioned the advantages of using a 64-bit OS, and it is recommended to use a 64-bit OS if possible.
Install OpenCV using pip
There is an easy way to install OpenCV from BullsEye. How to use the python pip command. As of March 2022, the latest version 4.5.5 is being installed.
And let's look at the build information of the packages installed using pip. The cv2.getBuildInformation() function tries to output build information.
pi@raspberrypi8GB:~ $ python
Python 3.9.2 (default, Feb 28 2021, 17:03:44)
[GCC 10.2.1 20210110] on linux
Type "help", "copyright", "credits" or "license"for more information.
>>> import cv2
>>> print(cv2.getBuildInformation())
General configuration for OpenCV 4.5.5 =====================================
Version control: 4.5.5-dirty
Platform:
Timestamp: 2022-03-04T10:02:17Z
Host: Linux 4.9.140-tegra aarch64
CMake: 3.22.2
CMake generator: Unix Makefiles
CMake build tool: /bin/gmake
Configuration: Release
CPU/HW features:
Baseline: NEON FP16
C/C++:
Built as dynamic libs?: NO
C++ standard: 11
C++ Compiler: /opt/rh/devtoolset-10/root/usr/bin/c++ (ver 10.2.1)
C++ flags (Release): -Wl,-strip-all -fsigned-char -W -Wall -Werror=return-type -Werror=non-virtual-dtor -Werror=address -Werror=sequence-point -Wformat -Werror=format-security -Wmissing-declarations -Wundef -Winit-self -Wpointer-arith -Wshadow -Wsign-promo -Wuninitialized -Wsuggest-override -Wno-delete-non-virtual-dtor -Wno-comment -Wimplicit-fallthrough=3 -Wno-strict-overflow -fdiagnostics-show-option -pthread -fomit-frame-pointer -ffunction-sections -fdata-sections -fvisibility=hidden -fvisibility-inlines-hidden -O3 -DNDEBUG -DNDEBUG
C++ flags (Debug): -Wl,-strip-all -fsigned-char -W -Wall -Werror=return-type -Werror=non-virtual-dtor -Werror=address -Werror=sequence-point -Wformat -Werror=format-security -Wmissing-declarations -Wundef -Winit-self -Wpointer-arith -Wshadow -Wsign-promo -Wuninitialized -Wsuggest-override -Wno-delete-non-virtual-dtor -Wno-comment -Wimplicit-fallthrough=3 -Wno-strict-overflow -fdiagnostics-show-option -pthread -fomit-frame-pointer -ffunction-sections -fdata-sections -fvisibility=hidden -fvisibility-inlines-hidden -g -O0 -DDEBUG -D_DEBUG
C Compiler: /opt/rh/devtoolset-10/root/usr/bin/cc
C flags (Release): -Wl,-strip-all -fsigned-char -W -Wall -Werror=return-type -Werror=address -Werror=sequence-point -Wformat -Werror=format-security -Wmissing-declarations -Wmissing-prototypes -Wstrict-prototypes -Wundef -Winit-self -Wpointer-arith -Wshadow -Wuninitialized -Wno-comment -Wimplicit-fallthrough=3 -Wno-strict-overflow -fdiagnostics-show-option -pthread -fomit-frame-pointer -ffunction-sections -fdata-sections -fvisibility=hidden -O3 -DNDEBUG -DNDEBUG
C flags (Debug): -Wl,-strip-all -fsigned-char -W -Wall -Werror=return-type -Werror=address -Werror=sequence-point -Wformat -Werror=format-security -Wmissing-declarations -Wmissing-prototypes -Wstrict-prototypes -Wundef -Winit-self -Wpointer-arith -Wshadow -Wuninitialized -Wno-comment -Wimplicit-fallthrough=3 -Wno-strict-overflow -fdiagnostics-show-option -pthread -fomit-frame-pointer -ffunction-sections -fdata-sections -fvisibility=hidden -g -O0 -DDEBUG -D_DEBUG
Linker flags (Release): -L/root/ffmpeg_build/lib -Wl,--gc-sections -Wl,--as-needed
Linker flags (Debug): -L/root/ffmpeg_build/lib -Wl,--gc-sections -Wl,--as-needed
ccache: YES
Precompiled headers: NO
Extra dependencies: /lib64/libopenblas.so Qt5::Core Qt5::Gui Qt5::Widgets Qt5::Test Qt5::Concurrent /lib64/libz.so dl m pthread rt
3rdparty dependencies: libprotobuf ade ittnotify libjpeg-turbo libwebp libpng libtiff libopenjp2 IlmImf quirc tegra_hal
OpenCV modules:
To be built: calib3d core dnn features2d flann gapi highgui imgcodecs imgproc ml objdetect photo python3 stitching video videoio
Disabled: world
Disabled by dependency: -
Unavailable: java python2 ts
Applications: -
Documentation: NO
Non-free algorithms: NO
GUI: QT5
QT: YES (ver 5.15.0 )
QT OpenGL support: NO
GTK+: NO
VTK support: NO
Media I/O:
ZLib: /lib64/libz.so (ver 1.2.7)
JPEG: libjpeg-turbo (ver 2.1.2-62)
WEBP: build (ver encoder: 0x020f)
PNG: build (ver 1.6.37)
TIFF: build (ver 42 - 4.2.0)
JPEG 2000: build (ver 2.4.0)
OpenEXR: build (ver 2.3.0)
HDR: YES
SUNRASTER: YES
PXM: YES
PFM: YES
Video I/O:
DC1394: NO
FFMPEG: YES
avcodec: YES (58.134.100)
avformat: YES (58.76.100)
avutil: YES (56.70.100)
swscale: YES (5.9.100)
avresample: NO
GStreamer: NO
v4l/v4l2: YES (linux/videodev2.h)
Parallel framework: pthreads
Trace: YES (with Intel ITT)
Other third-party libraries:
Lapack: YES (/lib64/libopenblas.so)
Eigen: NO
Custom HAL: YES (carotene (ver 0.0.1))
Protobuf: build (3.19.1)
OpenCL: YES (no extra features)
Include path: /io/opencv/3rdparty/include/opencl/1.2
Link libraries: Dynamic load
Python 3:
Interpreter: /opt/python/cp36-cp36m/bin/python3.6 (ver 3.6.15)
Libraries: libpython3.6m.a (ver 3.6.15)
numpy: /opt/python/cp36-cp36m/lib/python3.6/site-packages/numpy/core/include (ver 1.19.3)
install path: python/cv2/python-3
Python (for build): /bin/python2.7
Java:
ant: NO
JNI: NO
Java wrappers: NO
Java tests: NO
Install to: /io/_skbuild/linux-aarch64-3.6/cmake-install
-----------------------------------------------------------------
There are a few things to watch out for above. GStreamer values from Video I/O. For OpenCV 4.5.5 installed with pip, this value is No. That is, I didn't use "-D WITH_GSTREAMER=ON" in the OpenCV build options. Therefore, this package cannot be used with GStreamer.
Now, we will use this package to control the Raspberry Pi CSI camera. I have only connected one CSI camera to the Raspberry Pi, and the sample code is a simple camera preview python code. This simple Python code uses the cv2.VideoCapture(0) function to open a CSI camera and then displays it on the screen.
importcv2importsyscap=cv2.VideoCapture(0)ifcap.isOpened()==False:print('camera open Failed')sys.exit(0)cap.set(cv2.CAP_PROP_FRAME_WIDTH,640);cap.set(cv2.CAP_PROP_FRAME_HEIGHT,480);whileTrue:succes,img=cap.read()ifsucces==False:print('camera read Failed')sys.exit(0)k=cv2.waitKey(1)ifk==ord('q'):breakcv2.imshow('Img',img)cap.release()cv2.destroyAllWindows()
<preview.py>
And before testing the Python program, let's check the camera. /dev/video0 exists.
There seems to be no problem at all using the cv2.VideoCapture(0) function. Now run the python program. But an error occurs. The camera connection works normally when tested with the libcamera-hello command.
pi@raspberrypi8GB:~/src $ python3 preview.py
camera read Failed
This problem is caused by not handling libcamera properly in OpenCV being used. If you enable Legacy Camera in raspi-config, reboot and test this program again. You can check that it works normally. In the end, it wasn't a problem with the Python code, it was a problem caused by OpenCV's inability to handle libcamera.
<Operation screen after restoring to Legacy mode>
The bottom line is that the cv2.VideoCapture(0) function, which opens the camera in OpenCV, works fine with the legacy camera stack, but not with the new libcamera stack.
GStreamer and OpenCV
The SBC (Single Board Computer) I mainly use are Raspberry Pi, Jetson Nano, Jetson Xavier NX, and Korean Odroid. Raspberry Pi and Jetson series are often used for development. However, in the Jetson series, it is possible to use the camera module V2 for Raspberry Pi. And if you look at the OpenCV code that controls the camera in the Jetson series, GStreamer is used.
I'm using a pipelined string that I pass to gstreamer instead of the number I normally use in cv2.VideoCapture function. I skipped this part too, but after seeing the changed Raspberry Pi camera stack structure in BullsEye, I understood why NVidia used this method. Not only is Gstreamer a good implementation of the open source camera stack libcamera, but it also made it easy to control the camera by creating and adding a pipeline component ("nvarguscamerasrc" in the above string) for NVidia's SoC.
The conclustion is that if we want to use OpenCV with BullsEye's new camera stack, libcamera, we must also use GStreamer. I confirmed earlier that OpenCV installed with pip does not support GStreamer. This led me to the another conclusion that I had to build my own OpenCV to support GStreamer.
Build GStreamer Support OpenCV on BullsEye 64-bit
OpenCV is a pretty big package. On Raspberry Pi 4, it takes about 1-2 hours to build. And since the build requires a lot of memory, it is recommended that those who use the 2GB model secure virtual memory and increase the memory before building.
increase virtual memory
Applies to 2GB model users only. There are two ways to increase virtual memory. In the past, the swap file was used a lot, but recently there is a tendency to recommend using zram, which increases memory by compressing RAM. No matter which method you choose, there is no big problem. You can use both.
use swap file
$ sudo nano /etc/dphys-swapfile
#Find "CONF_MAXSWAP" and set 4096 CONF_MAXSWAP=4096
# reboot$ sudo reboot
use zram
$ git clone https://github.com/StuartIanNaylor/zram-swap-config \
&& cd zram-swap-config
$ sudo ./install.sh
$ sudo nano /etc/zram-swap-config.conf
#Find below lines and set the valuesMEM_FACTOR=40
DRIVE_FACTOR=300
COMP_ALG=lz4
SWAP_DEVICES=1
SWAP_PRI=75
PAGE_CLUSTER=0
SWAPPINESS=90
# reboot$ sudo reboot
Now, after rebooting, if you check the memory with the free -m command, you can see that the swap part has increased a lot.
Build OpenCV on BullsEye OS (32-bit, 64-bit common)
Here is the build, this script was introduced in Install OpenCV 4.5 on Raspberry Pi 4. If you replace 4.5.5 with the version you want in the script below, the code of that version is built.
You can create and run the install_opencv.sh file with the above contents. After the build is finished, the script is made to install it automatically. And most importantly, "-D WITH_GSTREAMER=ON " is added to the build options. A build time of about an hour or more is required.
# If you already installed OpenCV using pip, remove the preinstalled OpenCV.$ pip3 uninstall opencv-python
$ chmod 755 install_opencv.sh
$ ./install_opencv.sh
Check GStreamer Support OpenCV
The build script even does the installation. If the script finishes successfully, now check the build information again.
You can see that GStreamer has changed to YES (1.18.4) in Video I/O. Now the OpenCV we built can use GStreamer. BullsEye has some GStreamer-related packages installed, but to use GStreamer in OpenCV, you need to install some additional programs.
# install a missing dependency$ sudo apt-get install libx264-dev libjpeg-dev
# install the remaining plugins$ sudo apt-get install libgstreamer1.0-dev \
libgstreamer-plugins-base1.0-dev \
libgstreamer-plugins-bad1.0-dev \
gstreamer1.0-plugins-ugly \
gstreamer1.0-tools
# install some optional plugins$ sudo apt-get install gstreamer1.0-gl gstreamer1.0-gtk3
# if you have Qt5 install this plugin$ sudo apt-get install gstreamer1.0-qt5
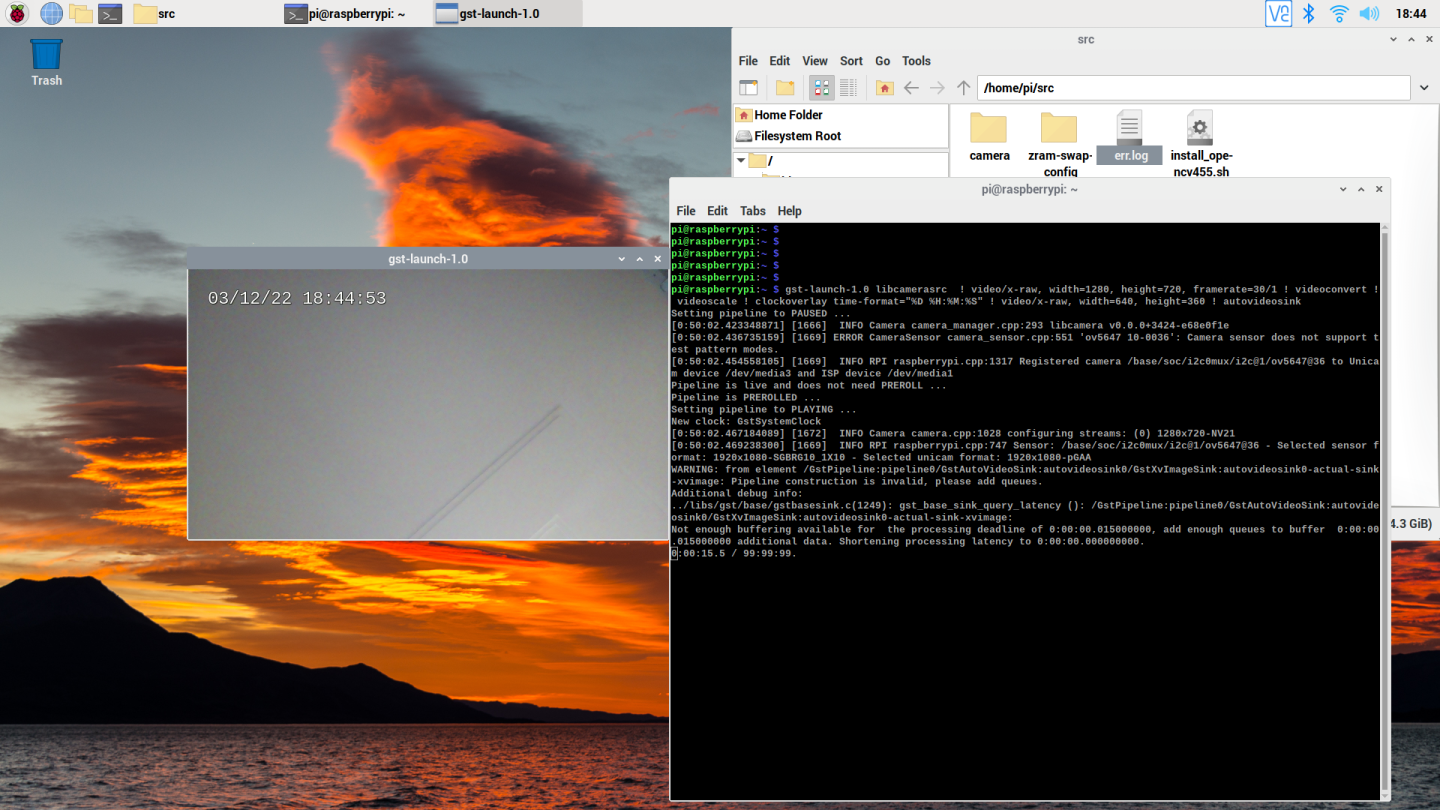
Now let's check if GStreamer properly controls the camera in the BullsEye libcamera stack environment. You can see that the GStreamer pipeline starts at libcamerasrc.
pi@raspberrypi:~ $ gst-launch-1.0 libcamerasrc  ! video/x-raw, width=1280, height=720, framerate=30/1 ! videoconvert ! videoscale ! clockoverlay time-format="%D %H:%M:%S" ! video/x-raw, width=640, height=360 ! autovideosink
Setting pipeline to PAUSED ...
[0:50:02.423348871] [1666]  INFO Camera camera_manager.cpp:293 libcamera v0.0.0+3424-e68e0f1e
[0:50:02.436735159] [1669] ERROR CameraSensor camera_sensor.cpp:551 'ov5647 10-0036': Camera sensor does not support test pattern modes.
[0:50:02.454558105] [1669]  INFO RPI raspberrypi.cpp:1317 Registered camera /base/soc/i2c0mux/i2c@1/ov5647@36 to Unicam device /dev/media3 and ISP device /dev/media1
Pipeline is live and does not need PREROLL ...
Pipeline is PREROLLED ...
Setting pipeline to PLAYING ...
New clock: GstSystemClock
[0:50:02.467184089] [1672]  INFO Camera camera.cpp:1028 configuring streams: (0) 1280x720-NV21
[0:50:02.469238300] [1669]  INFO RPI raspberrypi.cpp:747 Sensor: /base/soc/i2c0mux/i2c@1/ov5647@36 - Selected sensor format: 1920x1080-SGBRG10_1X10 - Selected unicam format: 1920x1080-pGAA
WARNING: from element /GstPipeline:pipeline0/GstAutoVideoSink:autovideosink0/GstXvImageSink:autovideosink0-actual-sink-xvimage: Pipeline construction is invalid, please add queues.
Additional debug info:
../libs/gst/base/gstbasesink.c(1249): gst_base_sink_query_latency (): /GstPipeline:pipeline0/GstAutoVideoSink:autovideosink0/GstXvImageSink:autovideosink0-actual-sink-xvimage:
Not enough buffering available for  the processing deadline of 0:00:00.015000000, add enough queues to buffer  0:00:00.015000000 additional data. Shortening processing latency to 0:00:00.000000000.
And the camera screen is displayed properly on the screen as follows. For reference, in Raspberry Pi OS, Legacy Camera is disabled. You can see that GStreamer takes good control of the camera in the libcamera stack environment.
<GStreamer screen working normally in libcamera stack>
I have verified that GStreamer handles CSI camera properly using libcamera. Now let's finally open the camera using the GStreamer pipeline in OpenCV.
Camera control using libcamera stack in OpenCV
Here is the Python OpenCV code using the GStreamer pipeline.
It is almost identical to the preview.py we created earlier. The biggest difference is that the parameters of the cv2.VideoCapture function have changed a lot.
The string used as a parameter is almost identical to the pipeline used in the GStreamer test using gst-launch-1.0 earlier. Only the last sink part has been replaced with appsink.
Now let's run it.
pi@raspberrypi:~/src/camera $ python3 preview_gstreamer.py
[1:30:40.993962062] [1859]  INFO Camera camera_manager.cpp:293 libcamera v0.0.0+3424-e68e0f1e
[1:30:41.007467606] [1863] ERROR CameraSensor camera_sensor.cpp:551 'ov5647 10-0036': Camera sensor does not support test pattern modes.
[1:30:41.025695799] [1863]  INFO RPI raspberrypi.cpp:1317 Registered camera /base/soc/i2c0mux/i2c@1/ov5647@36 to Unicam device /dev/media3 and ISP device /dev/media1
[1:30:41.036632907] [1866]  INFO Camera camera.cpp:1028 configuring streams: (0) 640x480-NV21
[1:30:41.038899151] [1863]  INFO RPI raspberrypi.cpp:747 Sensor: /base/soc/i2c0mux/i2c@1/ov5647@36 - Selected sensor format: 640x480-SGBRG10_1X10 - Selected unicam format: 640x480-pGAA
[ WARN:0@0.648] global /home/pi/opencv/modules/videoio/src/cap_gstreamer.cpp (1374) open OpenCV | GStreamer warning: unable to query duration of stream
[ WARN:0@0.648] global /home/pi/opencv/modules/videoio/src/cap_gstreamer.cpp (1405) open OpenCV | GStreamer warning: Cannot query video position: status=0, value=-1, duration=-1
There is an error message, but it is working normally. This error message also occurs in the libcamera-still program, but it does not cause any problems. I think it will be improved when the libcamera stack is updated. The camera preview window appears successfully as shown in the following figure.
<OpenCV screen working normally in libcamera stack>
Wrapping up
With the Raspberry Pi OS updated to BullsEye, the camera control part has changed radically, causing a lot of confusion for developers using CSI cameras. Also, it seems that they switched the camera stack from Legacy to libcamera too quickly without even the Picamera package for Python being properly prepared. If you are a developer using the Picamera package, we recommend that you use BullsEye's camera stack back to Legacy.
And if you are a developer using OpenCV, you can solve it by building OpenCV as described above and then using GStreamer. GStreamer has great flexibility because it connects the desired functionality in a pipelined way. If you habitually use 0 index to control the camera with cv2.VideoCapture(0), please pay attention to how to use GStreamer. As you can see from the example above, even date and time information can be easily printed in the preview window without the help of OpenCV.