2020년 6월 30일 화요일

Jetson Nano - YoloV4 Object Tracking

We have already learned how to distinguish objects in an image.
Previous blogs showed how to use Tensorflow, Pytorch Detectron2, DETR, and NVIDIA DNN Vision Library.
And recently I also looked at object detection using YOLOv4.
So far, Object Detection has been performed using still images, video files, or webcams.
When using video and webcams, the main concerns were whether the recognition was correct on a frame-by-frame basis and processing speed (FPS).

Object Tracking is mainly used in video. Object tracking is to determine whether objects recognized in consecutive frames are the same or not, and to track the path of movement in the case of the same objects.
For example, Object Tracking is essential to count floating populations on the street.
With Object Detection technology, the number of people in one frame can be counted, but the number of people who have passed a distance for an hour cannot be counted without using Object Tracking technology. Object Tracking is diverse. There are many algorithms and many methods like "Centroid Tracking", "SORT(Simple Online and Realtime Tracking)".  Among them, SORT is a popular object tracking technology. SORT is highly accurate because it uses a Kalman filter that removes noise when predicting the moving path of an object. Recently, DeepSORT, which adds Deep Learning technology to SORT, is also widely used.

SORT and DeepSORT

SORT consists of Object Detection, KalmanFilter, and Hungarian algorithm.

  • Object Detection : You can use various frameworks such as YOLO, PyTorch Detectron, Tensorflow Object Detection.
  • KalmanFilter : After removing noise components from the moving path and speed of the previous object, predict the next position.
  • Hungarian algorithm : The Hungarian algorithm determines the movement of the same object, the appearance of new objects, and the disappearance of existing objects by calculating the positions predicted by the Kalman filter and the positions of real objects.
<SORT >

However, there are weaknesses in the Hungarian algorithm. If the positions of two objects overlap, the object recognized in the next frame is reversed. This is because the Hungarian algorithm does not take into account the features of things. Because humans understand both the location and features of objects perceived by the eyes, even if the overlapping objects become farther away, they can be accurately identified and tracked without confusion. DeepSORT complements this weakness. DeepSORT is an improvement that enables the tracking of objects more accurately by reflecting the features of objects in the Hungarian algorithm.


<DeepSORT >


DeepSORT Object Tracking using Tensorflow,  YOLOv4

As mentioned before, it is not necessary to use the YOLOv4 Object Detection model to use DeepSORT. You can also use PyTorch Detectron2 or NVIDIA vision library. Here, we will convert the YOLOv4 model for Tensorflow.
There are many examples of DeepSORT on github. Most cover similar content. In this article, I'll use yehengchen's github (https://github.com/yehengchen/Object-Detection-and-Tracking), modified for Jetson Nano.

Prerequisites

This article assumes that Jetson Nano uses JetPack 4.4 DP or higher. Installation instructions are explained at https://spyjetson.blogspot.com/2020/06/jetson-nano-jetpack-44-dp-and-pytorch.html.

And this project requires a lot of memory. Jetson Nano's 4GB of memory is quite scarce. Therefore, if the memory is not secured as much as possible, an error may occur due to insufficient memory in the process.

The Jetson Nano's Ubuntu desktop occupies about 1.5 GB of memory. Therefore, only 2.5 GB of memory is actually available.
Please delete Ubuntu Desktop and replace it with LXDE. Then, you can free up about 1 GB of memory.
Securing additional memory by changing the desktop was described in "Use more memory by changing Ububtu desktop to LXDE".

Why should I install TensorFlow?

YOLO is sufficient to implement Object Detection. However, we will use DeepSORT tracking technology. Models needed for DeepSORT are in the model_data directory.
The extension pb files, market1501.pb, mars.pb, and mars-small128.pb files are models required for DeepSORT. These files work with Tensorflow.
Therefore, Tensorflow must be installed for DeepSORT. If you are using the model for DeepSORT for PyTorch, you might need to install PyTorch instead of Tensorflow.

Install Tensorflow

In the Jetson series, tensorflow should not be built according to the contents of the Tensorflow homepage. Download and install Tensorflow for Jetson provided by NVidia. We will be using Tensorflow version 1.5 for JetPack 4.4.
To install Tensorflow for Jetpack 4.4, follow the instructions in "JetsonNano-Installing Tensorflow".

Install necessary packages

Keras, scipy, scikit-learn, etc. used by yehengchen's github are version sensitive. Therefore, please keep the version indicated below.

apt-get install liblapack-dev libatlas-base-dev gfotran

#numpy to 1.19.0
pip3 install --upgrade numpy 
pip3 install Keras==2.3.1
pip3 install scikit-learn==0.21.2
pip3 install scipy
#scipy to 1.5.0
pip3 install --upgrade scipy

Install yehengchen's github

Now that you're ready, download the source code .

cd /usr/local/src
git clone https://github.com/yehengchen/Object-Detection-and-Tracking.git

## Download the YOLOv4 model
cd Object-Detection-and-Tracking/OneStage/yolo/deep_sort_yolov4/ wget https://github.com/AlexeyAB/darknet/releases/download/darknet_yolo_v3_optimal/yolov4.weights
cd model_data/
cp "/usr/local/src/Object-Detection-and-Tracking/OneStage/yolo/Train-a-YOLOv4-model/cfg/yolov4.cfg" ./
cp yolo_anchors.txt yolo4_anchors.txt

## Convert the YOLOv4 models to Keras model
## If there are not enough memory, the conversion process might fail.
cd ..
python3 convert.py "model_data/yolov4.cfg" "model_data/yolov4.weights" "model_data/yolo.h5"


##Download the test video clip
wget https://git.kpi.fei.tuke.sk/ml163fe/atvi/-/raw/4f70d8fd9c263b5a90dcdbc7a94b1176a520124c/python_objects_detection/TownCentreXVID.avi -O test_video/TownCentreXVID.avi


Object tracking with sample video

Now let's check whether it works properly using the video clip downloaded earlier.
I modified the main.py file to print the FPS value. The FPS values ​​were divided into two FPS values, including the time to process the inference frame in the model and the time to output the screen and write it to a new video file. The modified main.py file can be downloaded from my github.

This command, TownCentreXVID.avi file has the following properties.
  • Total 11475 frames, 15 frames/second, 1920 X 1080 frame size.
Therefore, it takes a lot of time to process this video clip. If you want to abort, press Ctrl+C during execution.

root@jetpack-4:/usr/local/src/Object-Detection-and-Tracking/OneStage/yolo/deep_sort_yolov4# python3 main.py -c person -i "./test_video/TownCentreXVID.avi"  
Using TensorFlow backend.
2020-06-30 18:40:19.078024: I tensorflow/stream_executor/platform/default/dso_loader.cc:48] Successfully opened dynamic library libcudart.so.10.2
/usr/local/lib/python3.6/dist-packages/sklearn/utils/linear_assignment_.py:21: DeprecationWarning: The linear_assignment_ module is deprecated in 0.21 and will be removed from 0.23. Use scipy.optimize.linear_sum_assignment instead.
  DeprecationWarning)
WARNING:tensorflow:From main.py:27: The name tf.ConfigProto is deprecated. Please use tf.compat.v1.ConfigProto instead.

2020-06-30 18:40:31.516170: W tensorflow/core/platform/profile_utils/cpu_utils.cc:98] Failed to find bogomips in /proc/cpuinfo; cannot determine CPU frequency

..........
2020-06-30 18:41:59.919461: I tensorflow/stream_executor/platform/default/dso_loader.cc:48] Successfully opened dynamic library libcudnn.so.8
2020-06-30 18:42:07.822707: W tensorflow/core/common_runtime/bfc_allocator.cc:239] Allocator (GPU_0_bfc) ran out of memory trying to allocate 1.75GiB with freed_by_count=0. The caller indicates that this is not a failure, but may mean that there could be performance gains if more memory were available.
2020-06-30 18:42:07.823401: I tensorflow/stream_executor/platform/default/dso_loader.cc:48] Successfully opened dynamic library libcublas.so.10
2020-06-30 18:42:15.321959: W tensorflow/core/common_runtime/bfc_allocator.cc:239] Allocator (GPU_0_bfc) ran out of memory trying to allocate 1.21GiB with freed_by_count=0. The caller indicates that this is not a failure, but may mean that there could be performance gains if more memory were available.
2020-06-30 18:42:16.545443: W tensorflow/core/common_runtime/bfc_allocator.cc:239] Allocator (GPU_0_bfc) ran out of memory trying to allocate 2.06GiB with freed_by_count=0. The caller indicates that this is not a failure, but may mean that there could be performance gains if more memory were available.
2020-06-30 18:42:17.661731: W tensorflow/core/common_runtime/bfc_allocator.cc:239] Allocator (GPU_0_bfc) ran out of memory trying to allocate 2.06GiB with freed_by_count=0. The caller indicates that this is not a failure, but may mean that there could be performance gains if more memory were available.
..........

Net FPS:0.016420
FPS:0.015778
Net FPS:0.257968
FPS:0.234274
Net FPS:0.321014
FPS:0.291949
Net FPS:0.314152
FPS:0.287686

The following image captures a frame from the output.avi file created in the output directory.
<output.avi>

You can see the 0.27 FPS value displayed at the top left. You can see that tracking works by playing the created video file. However, the 0.3 FPS value is problematic. Because video frames are processed sequentially, the accuracy is the same except for the time-consuming problem, but it is a big problem in real-time video capture.
If it takes about 3 seconds or more to process 1 frame, the accuracy of tracking is too low when the position change value of the object (person) is too large when trying to process the next frame.


Wrapping up

I implemented object tracking using YOLOv4 and Deep SORT in Jetson Nano.
Unfortunately, it achieved a low performance of 0.3 FPS. Applying this value to a real-time camera makes object tracking accuracy too low. Therefore, it is inappropriate to use YOLOv4 + DeepSORT in Jetson Nano. Sooner or later, I will make an opportunity to find out how to apply the YOLOv4 tiny model or run this example on the Jetson Xavier NX to speed up.



2020년 6월 28일 일요일

Jetson Nano - YoloV4 Python implementation

I am a big fan of Python. In the last article, you learned how to install YOLOv4. In this article, I will show you how to use YOLOv4 with Python. And let's look at performance.

Simple darknet.py

Darknet.py, downloaded from github, is difficult to analyze because the code size is quite large.
The darknet_video.py file is easily implemented by importing the darknet.py file. Let's refer to this file and create code to recognize the image file.  To use this file, the darknet.py file must exist in the same directory.

from ctypes import *
import math
import random
import os
import cv2
import numpy as np
import time
import darknet
import argparse

parser = argparse.ArgumentParser()
parser.add_argument('--file', type=str, default = '')
parser.add_argument('--weight', type=str, default = './weights//yolov4.weights', help = 'Yolo weight file')
parser.add_argument('--config', type=str, default = './cfg/yolov4.cfg', help = 'Yolo config file')
parser.add_argument('--meta', type=str, default = './cfg/coco.data', help = 'Yolo meta file')
parser.add_argument('--out', type=str, default = './yolo_out.jpg', help = 'output file')
opt = parser.parse_args()

def convertBack(x, y, w, h):
    xmin = int(round(x - (w / 2)))
    xmax = int(round(x + (w / 2)))
    ymin = int(round(y - (h / 2)))
    ymax = int(round(y + (h / 2)))
    return xmin, ymin, xmax, ymax

'''
Original code draw boxes on the inference image(608X608)
I modified to draw to the original image.
'''
def cvDrawBoxes(detections, im, resized):
    img = im.copy()
    height, width, _ = im.shape
    rheight, rwidth, _ = resized.shape
    
    hrate = height / rheight 
    wrate = width / rwidth 
    
    for detection in detections:
        x, y, w, h = detection[2][0] * wrate, detection[2][1] * hrate, detection[2][2] * wrate, detection[2][3]  * hrate
        xmin, ymin, xmax, ymax = convertBack(
            float(x), float(y), float(w), float(h))
        pt1 = (xmin, ymin)
        pt2 = (xmax, ymax)
        cv2.rectangle(img, pt1, pt2, (0, 255, 0), 1)
        cv2.putText(img,
                    detection[0].decode() +
                    " [" + str(round(detection[1] * 100, 2)) + "]",
                    (pt1[0], pt1[1] - 5), cv2.FONT_HERSHEY_SIMPLEX, 0.5,
                    [0, 255, 0], 2)
    return img


netMain = None
metaMain = None
altNames = None


def YOLO():
    global metaMain, netMain, altNames
    configPath = opt.config
    weightPath = opt.weight
    metaPath = opt.meta
    if not os.path.exists(configPath):
        raise ValueError("Invalid config path `" +
                         os.path.abspath(configPath)+"`")
    if not os.path.exists(weightPath):
        raise ValueError("Invalid weight path `" +
                         os.path.abspath(weightPath)+"`")
    if not os.path.exists(metaPath):
        raise ValueError("Invalid data file path `" +
                         os.path.abspath(metaPath)+"`")
    if netMain is None:
        netMain = darknet.load_net_custom(configPath.encode(
            "ascii"), weightPath.encode("ascii"), 0, 1)  # batch size = 1
    if metaMain is None:
        metaMain = darknet.load_meta(metaPath.encode("ascii"))
    if altNames is None:
        try:
            with open(metaPath) as metaFH:
                metaContents = metaFH.read()
                import re
                match = re.search("names *= *(.*)$", metaContents,
                                  re.IGNORECASE | re.MULTILINE)
                if match:
                    result = match.group(1)
                else:
                    result = None
                try:
                    if os.path.exists(result):
                        with open(result) as namesFH:
                            namesList = namesFH.read().strip().split("\n")
                            altNames = [x.strip() for x in namesList]
                except TypeError:
                    pass
        except Exception:
            pass

   
    # Create an image we reuse for each detect
    print('W:%d H:%d'%(darknet.network_width(netMain), darknet.network_height(netMain)))
    darknet_image = darknet.make_image(darknet.network_width(netMain),
                                    darknet.network_height(netMain),3)
    im = cv2.imread(opt.file, cv2.IMREAD_COLOR)
    rgb = cv2.cvtColor(im, cv2.COLOR_BGR2RGB)
    resized = cv2.resize(rgb,(darknet.network_width(netMain), darknet.network_height(netMain)), interpolation=cv2.INTER_LINEAR)
    darknet.copy_image_from_bytes(darknet_image, resized.tobytes())
    for i in range(2):
        s = time.time()
        detections = darknet.detect_image(netMain, metaMain, darknet_image, thresh=0.25)
        FPS = 1 / (time.time() - s)
        print('Net FPS:%6.3f'%(FPS))
    image = cvDrawBoxes(detections, im, resized)
    cv2.imwrite(opt.out, image)
    

if __name__ == "__main__":
    YOLO()
<darknet_image.py>

Run the code.

root@jetpack-4:/usr/local/src/darknet# python3 darknet_image.py --file='../test_images/peds_0.jpg'
 Try to load cfg: ./cfg/yolov4.cfg, weights: ./weights//yolov4.weights, clear = 0
 0 : compute_capability = 530, cudnn_half = 0, GPU: NVIDIA Tegra X1
net.optimized_memory = 0
mini_batch = 1, batch = 8, time_steps = 1, train = 0
   layer   filters  size/strd(dil)      input                output
   0 conv     32       3 x 3/ 1    608 x 608 x   3 ->  608 x 608 x  32 0.639 BF
   1 conv     64       3 x 3/ 2    608 x 608 x  32 ->  304 x 304 x  64 3.407 BF
   2 conv     64       1 x 1/ 1    304 x 304 x  64 ->  304 x 304 x  64 0.757 BF
   3 route  1                                      ->  304 x 304 x  64
   4 conv     64       1 x 1/ 1    304 x 304 x  64 ->  304 x 304 x  64 0.757 BF
   5 conv     32       1 x 1/ 1    304 x 304 x  64 ->  304 x 304 x  32 0.379 BF
   6 conv     64       3 x 3/ 1    304 x 304 x  32 ->  304 x 304 x  64 3.407 BF
   7 Shortcut Layer: 4,  wt = 0, wn = 0, outputs: 304 x 304 x  64 0.006 BF
   8 conv     64       1 x 1/ 1    304 x 304 x  64 ->  304 x 304 x  64 0.757 BF
   9 route  8 2                                    ->  304 x 304 x 128
   .....
   .....
[yolo] params: iou loss: ciou (4), iou_norm: 0.07, cls_norm: 1.00, scale_x_y: 1.05
nms_kind: greedynms (1), beta = 0.600000
Total BFLOPS 128.459
avg_outputs = 1068395
 Allocate additional workspace_size = 106.46 MB
 Try to load weights: ./weights//yolov4.weights
Loading weights from ./weights//yolov4.weights...
 seen 64, trained: 32032 K-images (500 Kilo-batches_64)
Done! Loaded 162 layers from weights-file
Loaded - names_list: data/coco.names, classes = 80
W:608 H:608
Net FPS: 0.363
Net FPS: 0.625

As mentioned many times, the first inference execution time always takes a long time. Therefore, it is better to regard the inference time after the second as the execution time of the model.
The processing speed using the yolov4.weights model was FPS 0.6. You can specify the inference size in yolov4.cfg file. The default value is 608X608. The above FPS value is using this size. Therefore, lowering this value will increase the FPS value. Later I will measure the FPS value by adjusting these values.

<yolo_out.jpg>


Performance Test

I tested using the darknet_image.py file on the Jetson Nano. Before running the Python program, the width and height values ​​of cfg/yoloyv4.cfg were adjusted.
And after loading the model, I input the inference image twice and took the second value.

        Model       
    Inference Image        
    FPS 
 YOLOv4 608 0.63
 YOLOv4 512 0.9
 YOLOv4 416 1.29
 YOLOv4 320 2.04
 YOLOv4-tiny 608 0.64
 YOLOv4-tiny 512 0.91
 YOLOv4-tiny 416 1.32
 YOLOv4-tiny 320 2.13

As you can see, FPS values ​​between 0.6 and 2.2 were recorded. These values ​​are insufficient to apply to real-time video. However, the accuracy of YOLOv4 is very good. Personally, the best accuracy in Object Detection is YOLOv4 and PyTorch using ResNet-50 and ResNet-101.

Comparison with other models

Let's do a simple comparison with the other Object Detection Model introduced in the previous article.
The comparison targets are PyTorch's Detectron2 and NVidia's DNN Vision Library.
Detectron2 was introduced at https://spyjetson.blogspot.com/2020/06/jetson-nano-detectron2-segmentation.html and the DNN Vision Library was https://spyjetson.blogspot.com/2019/12/jetsonnano-hello- Introduced at ai-world-nvidia-dnn_18.html.

          Image        
   YOLOv4 (FPS)       PyTorch  Detectron2 (FPS)        NVIDIA detectNet (FPS)   
 humans_2.jpg 0.633  0.212682 16.516910
 city_1.jpg 0.628  0.211959 10.345220


<humans_2.jpg result>

<city_1.jpg result>


The reason why NVIDIA detectNet used ssd-mobilenet-v2, which is relatively inaccurate, is that detectNet doesn't provide as accurate but slow models as the other two models. NVIDIA detectNet was created considering the Jetson series. This is the result of detectnet using models that focus more on processing speed.

The above test results may lead to the following conclusions, although the samples are insufficient. Recognition accuracy is in the order of Detectron2, YOLOv4, and detectNet. However, the difference in accuracy between Detectron2 and YOLOv4 is relatively small.
And the processing speed is overwhelmingly fast for detectNet, and YOLOv4 is about 3 times faster than Dettectron2.


Wrapping up

Although the processing speed of YOLOv4 is not satisfactory, it records excellent accuracy. In the next post I will look at ways to speed up processing in YOLOv4.
You can download the source code at https://github.com/raspberry-pi-maker/NVIDIA-Jetson .


Jetson Nano - YoloV4 Installation

Today we will look at how to implement YOLOv4 on Jetson.  The following description of YOLO was taken from https://medium.com/@thundo/yolov4-on-jetson-nano-672c1d38aed2.


In 2014 Joseph Redmon started working on , a real-time object detector model. He created a C++/CUDA implementation that remained “official” for a few years. A couple months back he stopped working on the project altogether over privacy concerns.


Over time several forks have spawned, with gaining the spotlight. The fork, daily maintained, added several features (Windows support, half-precision, additional layers, etc) and gathered a rich list of models and variants. Thanks to constant attention and improvements, Darknet/YOLO remains one of the benchmarks for its problem category.

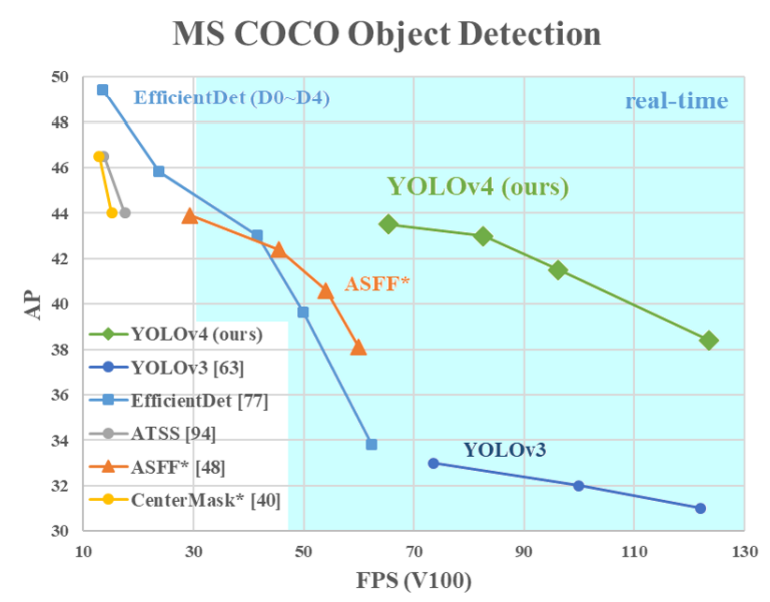
At the end of April 2020, Alexey and his team released the next iteration of Yolo, which improves both AP and FPS of YOLOv3 by about 10%.


Comparison between YOLOv4 and other detectors

With the system configuration behind us, we can now work on YOLO. Luckily for us, the Nvidia image ships with CUDA 10 and OpenCV 4.1.1 already installed: this saves us at least 1h of compilation time and plenty of headaches…


As explained above, you need OpenCV, Cuda, etc. software to build YOLOv4. All of these software are already installed in JetPack 4.4 that we will use.
For information on installing JetPack 4.4, see https://spyjetson.blogspot.com/2020/06/jetson-nano-jetpack-44-dp-and-pytorch.html. I also recommend installing PyTorch and Torchvision as described in the link blog. I will use it in the next blog.


Build YOLOv4

The YOLOv4 site we will be using at https://github.com/AlexeyAB/darknet#how-to-use-on-the-command-line explains two ways to install YOLOv4 on a Linux system.

The first method is to use CMake. To use this method, you must upgrade the version of CMake installed in JetPack 4.4. CMake 3.12 or higher is required to install YOLOv4, but JetPack 4.4 provides version 3.10.2 of CMake.
And the next method is to compile the source code immediately after modifying the Makefile.
We will use the second method.

Prerequisites

This article assumes that Jetson Nano uses JetPack 4.4 DP or higher and PyTorch 1.5.0 or higher and torchvision 0.6.0 or higher. Installation instructions are explained at https://spyjetson.blogspot.com/2020/06/jetson-nano-jetpack-44-dp-and-pytorch.html.

In order to compile CUDA-related sources, the CUDA path must be added to the environment variable.
First, do the following:

sudo apt update
sudo apt upgrade
sudo apt install -y git wget build-essential gcc g++ make binutils libcanberra-gtk-module
cd /usr/local/src
echo "export PATH=/usr/local/cuda/bin${PATH:+:${PATH}}" >> ~/.bashrc
echo "export LD_LIBRARY_PATH=/usr/local/cuda/lib64${LD_LIBRARY_PATH:+:${LD_LIBRARY_PATH}}" >> ~/.bashrc
source ~/.bashrc


Download the YOLOv4 codes and build them

Now, after downloading the source code from gitgub, we will compile.
First, download the codes.

git clone https://github.com/AlexeyAB/darknet.git
cd darknet

Next, modify the Makefile as follows. We will use Jetson Nano's GPU, so enable GPU options. We also use Cuda and OpenCV, so enable the CUDNN and OPENCV options. OPENMP improves execution speed through parallel processing in a multi-CPU environment, so enable this option too. LIBSO option builds libdarknet.so file that is necessary for python programming, so enable it too. Last thing you must do is changing the ARCH parameter that defines CPU architecture.

GPU=1
CUDNN=1make -j4
OPENCV=1
OPENMP=1
LIBSO=1
...
ARCH= -gencode arch=compute_53,code=[sm_53,compute_53]
...

Before building the source code, you need to install the library to use openmp.

apt-get install libomp-dev

Now build the source code. This process does not take long. It will be over in a few minutes.


make -j4


If the build completed successfully, you will see the following files.

root@jetpack-4:/usr/local/src/darknet# ls -al
total 257404
drwxr-xr-x 17 root root      4096  6월 28 00:06 .
drwxr-xr-x 13 root root      4096  6월 27 22:32 ..
drwxr-xr-x  4 root root      4096  6월 27 22:29 3rdparty
drwxr-xr-x  2 root root      4096  6월 27 23:30 backup
-rw-r--r--  1 root root        96  6월 27 23:50 bad.list
drwxr-xr-x  3 root root      4096  6월 27 22:29 build
-rwxr-xr-x  1 root root      8285  6월 27 22:29 build.ps1
drwxr-xr-x  3 root root      4096  6월 27 23:14 build_release
-rwxr-xr-x  1 root root      2044  6월 27 22:29 build.sh
drwxr-xr-x  3 root root      4096  6월 27 22:29 cfg
drwxr-xr-x  2 root root      4096  6월 27 22:29 .circleci
drwxr-xr-x  3 root root      4096  6월 27 22:29 cmake
-rw-r--r--  1 root root     20573  6월 27 22:29 CMakeLists.txt
-rwxr-xr-x  1 root root   2363032  6월 28 00:04 darknet
-rw-r--r--  1 root root      1363  6월 27 22:29 DarknetConfig.cmake.in
-rw-r--r--  1 root root     20083  6월 28 00:06 darknet.py
-rw-r--r--  1 root root      4010  6월 27 22:29 darknet_video.py
drwxr-xr-x  3 root root      4096  6월 27 22:29 data
drwxr-xr-x  8 root root      4096  6월 27 22:29 .git
drwxr-xr-x  4 root root      4096  6월 27 22:29 .github
-rw-r--r--  1 root root       581  6월 27 22:29 .gitignore
-rwxr-xr-x  1 root root       108  6월 27 22:29 image_yolov2.sh
-rwxr-xr-x  1 root root       110  6월 27 22:29 image_yolov3.sh
drwxr-xr-x  2 root root      4096  6월 27 22:29 include
-rwxr-xr-x  1 root root       345  6월 27 22:29 json_mjpeg_streams.sh
-rwxr-xr-x  1 root root   2608480  6월 28 00:04 libdarknet.so
-rw-r--r--  1 root root       515  6월 27 22:29 LICENSE
-rw-r--r--  1 root root      5480  6월 28 00:01 Makefile
-rwxr-xr-x  1 root root       159  6월 27 22:29 net_cam_v3.sh
drwxr-xr-x  2 root root      4096  6월 28 00:04 obj
-rw-r--r--  1 root root    494694  6월 27 23:51 predictions.jpg
-rw-r--r--  1 root root     59377  6월 27 22:29 README.md
drwxr-xr-x  2 root root      4096  6월 27 22:29 results
drwxr-xr-x  4 root root      4096  6월 27 22:29 scripts
drwxr-xr-x  2 root root      4096  6월 27 23:14 src
-rw-r--r--  1 root root     10549  6월 27 22:29 .travis.yml
-rwxr-xr-x  1 root root    134336  6월 28 00:05 uselib
-rwxr-xr-x  1 root root       108  6월 27 22:29 video_v2.sh
-rwxr-xr-x  1 root root       108  6월 27 22:29 video_yolov3.sh

Now download the pretrained model.

mkdir weights
cd weights
wget https://github.com/AlexeyAB/darknet/releases/download/darknet_yolo_v3_optimal/yolov4.weights
wget https://github.com/AlexeyAB/darknet/releases/download/darknet_yolo_v4_pre/yolov4-tiny.weights
## YoloV3 Models
wget https://pjreddie.com/media/files/yolov3.weights
wget https://pjreddie.com/media/files/yolov3-tiny.weights

And the yolov3-tiny-prn.weights file can be downloaded from https://drive.google.com/file/d/18yYZWyKbo4XSDVyztmsEcF9B_6bxrhUY/view?usp=sharing.

Test

If the build is successful, a darknet executable is created.
You can simply test it using this file.

root@jetpack-4:/usr/local/src/darknet# ./darknet detector test cfg/coco.data cfg/yolov4.cfg weights/yolov4.weights
 CUDA-version: 10020 (10020), cuDNN: 8.0.0, GPU count: 1
 OpenCV version: 4.1.1
 0 : compute_capability = 530, cudnn_half = 0, GPU: NVIDIA Tegra X1
net.optimized_memory = 0
mini_batch = 1, batch = 8, time_steps = 1, train = 0
   layer   filters  size/strd(dil)      input                output
   0 conv     32       3 x 3/ 1    608 x 608 x   3 ->  608 x 608 x  32 0.639 BF
   1 conv     64       3 x 3/ 2    608 x 608 x  32 ->  304 x 304 x  64 3.407 BF
   2 conv     64       1 x 1/ 1    304 x 304 x  64 ->  304 x 304 x  64 0.757 BF
   3 route  1                                      ->  304 x 304 x  64
   4 conv     64       1 x 1/ 1    304 x 304 x  64 ->  304 x 304 x  64 0.757 BF
   5 conv     32       1 x 1/ 1    304 x 304 x  64 ->  304 x 304 x  32 0.379 BF
   6 conv     64       3 x 3/ 1    304 x 304 x  32 ->  304 x 304 x  64 3.407 BF
   7 Shortcut Layer: 4,  wt = 0, wn = 0, outputs: 304 x 304 x  64 0.006 BF
   8 conv     64       1 x 1/ 1    304 x 304 x  64 ->  304 x 304 x  64 0.757 BF
   9 route  8 2                                    ->  304 x 304 x 128
   ....
   ....   
   ....   
   
[yolo] params: iou loss: ciou (4), iou_norm: 0.07, cls_norm: 1.00, scale_x_y: 1.05
nms_kind: greedynms (1), beta = 0.600000
Total BFLOPS 128.459
avg_outputs = 1068395
 Allocate additional workspace_size = 106.46 MB
Loading weights from weights/yolov4.weights...
 seen 64, trained: 32032 K-images (500 Kilo-batches_64)
Done! Loaded 162 layers from weights-file
Enter Image Path:

The darknet laods model first, so it takes some time. After loading the model, it asks you to input the image path.

Enter Image Path: /usr/local/src/test_images/peds_0.jpg
/usr/local/src/test_images/peds_0.jpg: Predicted in 3610.394000 milli-seconds.
person: 100%
person: 100%
person: 99%
tie: 74%
car: 97%
person: 99%
car: 99%
backpack: 90%
car: 99%
car: 75%
Enter Image Path:

darknet found 4 people, 4 cars, 1 backpack and 1 tie. The image used in the test is as follows.

<peds_0.jpg>

You can see that Darknet found the objects exactly.

Python Test

There is an example darknet.py file for Python. This file needs some modification to load the so file correctly.

lib = CDLL(os.path.join(os.getcwd(), "libdarknet.so"), RTLD_GLOBAL)

...

def performDetect(imagePath="data/dog.jpg", thresh= 0.25, configPath = "./cfg/yolov4.cfg", weightPath = "./weights/yolov4.weights", metaPath= "./cfg/coco.dat    a", showImage= True, makeImageOnly = False, initOnly= False):

...

 def performBatchDetect(thresh= 0.25, configPath = "./cfg/yolov4.cfg", weightPath = "./weights/yolov4.weights", metaPath= "./cfg/coco.data", hier_thresh=.5, n    ms=.45, batch_size=3):

As with the darknet executable above, after loading the model, search for the image of the ./data/dog.jpg file.

root@jetpack-4:/usr/local/src/darknet# python3 darknet.py detector test
 Try to load cfg: ./cfg/yolov4.cfg, weights: ./weights/yolov4.weights, clear = 0
 0 : compute_capability = 530, cudnn_half = 0, GPU: NVIDIA Tegra X1
net.optimized_memory = 0
mini_batch = 1, batch = 8, time_steps = 1, train = 0
   layer   filters  size/strd(dil)      input                output
   0 conv     32       3 x 3/ 1    608 x 608 x   3 ->  608 x 608 x  32 0.639 BF
   1 conv     64       3 x 3/ 2    608 x 608 x  32 ->  304 x 304 x  64 3.407 BF
   2 conv     64       1 x 1/ 1    304 x 304 x  64 ->  304 x 304 x  64 0.757 BF
   3 route  1                                      ->  304 x 304 x  64
   4 conv     64       1 x 1/ 1    304 x 304 x  64 ->  304 x 304 x  64 0.757 BF
   5 conv     32       1 x 1/ 1    304 x 304 x  64 ->  304 x 304 x  32 0.379 BF
   6 conv     64       3 x 3/ 1    304 x 304 x  32 ->  304 x 304 x  64 3.407 BF
   7 Shortcut Layer: 4,  wt = 0, wn = 0, outputs: 304 x 304 x  64 0.006 BF
   8 conv     64       1 x 1/ 1    304 x 304 x  64 ->  304 x 304 x  64 0.757 BF
   9 route  8 2                                    ->  304 x 304 x 128
   ....
   ....   
   ....   
   
[yolo] params: iou loss: ciou (4), iou_norm: 0.07, cls_norm: 1.00, scale_x_y: 1.05
nms_kind: greedynms (1), beta = 0.600000
Total BFLOPS 128.459
avg_outputs = 1068395
 Allocate additional workspace_size = 106.46 MB
 Try to load weights: ./weights/yolov4.weights
Loading weights from ./weights/yolov4.weights...
 seen 64, trained: 32032 K-images (500 Kilo-batches_64)
Done! Loaded 162 layers from weights-file
Loaded - names_list: data/coco.names, classes = 80
Unable to show image: No module named 'skimage'
[('dog', 0.9787506461143494, (220.9882049560547, 383.2079772949219, 184.41786193847656, 316.509033203125)), ('bicycle', 0.9217984080314636, (343.4819641113281, 276.87603759765625, 458.06488037109375, 298.71209716796875)), ('truck', 0.9183095097541809, (574.2606201171875, 123.24830627441406, 220.67367553710938, 93.20551300048828)), ('pottedplant', 0.33072125911712646, (699.326416015625, 131.88845825195312, 36.53395080566406, 45.44673538208008))]
   

Since we haven't installed the skimage package yet, it doesn't print, but the console output shows that there is a dog, a bike, a truck, and a potted plant.

<darknet/data/dog.jpg>
In YOLO, Python programs load and use C-coded so files directly for faster processing speed.


Wrapping up

So far, we have seen how to install YOLOv4 on Jetson Nano and have tested it simply. Next time, I'll create Python code that I can use for my purposes.