last updated 2020.07.10 : update for Jetpack 4.4 Production Version
New Jetpack 4.4 production version and PyTorch 1.6 installation is explained at https://spyjetson.blogspot.com/2020/07/jetson-nano-jetpack-44production.html
Pytorch has been upgraded to version 1.5. Therefore, PyTorch, which can be used in Jetson Nano, has also been upgraded to 1.5.0. In the Jetson series, you must use PyTorch, which is provided by NVidia, to properly utilize the cuda.
The new PyTorch can be downloaded from https://forums.developer.nvidia.com/t/pytorch-for-jetson-nano-version-1-5-0-now-available/72048.
However, from PyTorch 1.5, it can be installed only on JetPack 4.4 DP(Developer Preview) or higher. Therefore, prepare the JetPack 4.4 SD card image before proceeding with the PyTorch installation.
JetPack 4.4 DP Installation
Make SD Card
Download the SD Card image from the https://developer.nvidia.com/embedded/downloads.
<https://developer.nvidia.com/embedded/downloads>
After downloading the image file(nv-jetson-nano-sd-card-image-r32.4.2.zip), burn a SD Card image of JetPack 4.4 DP using Echer. If you use Echer, you don't have to unzip the zip image file. Just select the zip file as an image file. It is recommended to prepare an SD card with a storage space of 64 GB or more.
Headless setup
Now it's time to setup the Jetson Nano. And I would not use a monitor. I'm going to get it all done at once on a Windows machine.
First, connect the PC and the Jetson Nano with a USB cable.
Insert the SD card with JetPack 4.4 installed.
Next connect the 5V power cable to the Jetson Nano. Jetson Nano will boot now.
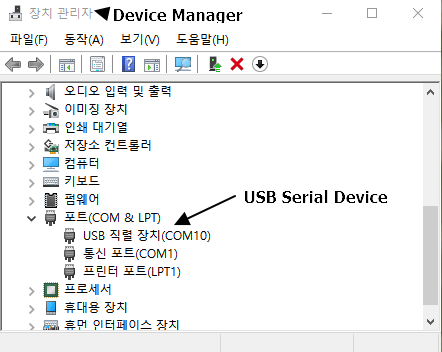
On your PC, open the "Windows Device Manager" and then, search for serial devices.
You can see that the new serial device is connected as shown above. Jetson Nano is connected on COM10 port.
Now you can access the Jetson Nano with a serial console using a tool like putty.
If everything is fine, the serial console window in the following figure will open.
Now, you can proceed with the setting in the order according to the contents of the screen. The network settings appear at the end of the setting. After completing this setting, you can connect using ssh. If you can't have a ssh connection, you can connect the serial console to the Jetson Nano at any time using a usb cable. And check the ssh configuration. If the ssh service is not running, activate and start the ssh service.
Finally I can connect the Jetson Nano with Jetpack 4.4 using ssh.
PyTorch 1.5.0 Installation
If you have already installed another version of PyTorch on your Jetpack 4.4 SD card, delete the old version first.
Delete old versions of PyTorch
First check pre-installed PyTorch. If there is no PyTorch version already installed, proceed to the next step.
root@spypiggy-nano:/usr/local/src/detr# pip3 freeze|grep torch
torch==1.1.0
torchvision==0.3.0

root@spypiggy-nano:/usr/local/src/detr# pip3 uninstall  torchvision==0.3.0
root@spypiggy-nano:/usr/local/src/detr# pip3 uninstall  torch==1.1.0
Download PyTorch for Jetson Nano
We always use Python 3.X. Therefore, download the whl file that can be used in Python 3.6. And install the necessary packages as follows. JetPack 4.3 and later comes with OpenCV 4.1.1 and numpy. So you don't have to install numpy anymore.
sudo apt-get update
wget https://nvidia.box.com/shared/static/3ibazbiwtkl181n95n9em3wtrca7tdzp.whl -O torch-1.5.0-cp36-cp36m-linux_aarch64.whl
sudo apt-get install python3-pip libopenblas-base libopenmpi-dev
pip3 install Cython
pip3 install torch-1.5.0-cp36-cp36m-linux_aarch64.whl
Download Torchvision for Jetson Nano
sudo apt-get install libjpeg-dev zlib1g-dev
git clone -b v0.6.0 https://github.com/pytorch/vision torchvision
cd torchvision
sudo python3 setup.py install
cd ../
apt-get install libfreetype6-dev
pip3 uninstall pillow
pip3 install --no-cache-dir pillow
Be Careful : You must use python3, pip3 commands. PyTorch 1.5 and later, Python 2 is no longer supported.
Let's check whether the installation is correct.
If you see thescreen like this, the installation is successful.
If you see thescreen like this, the installation is successful.
root@jetpack-4:/usr/local/src/torchvision# python3
Python 3.6.9 (default, Apr 18 2020, 01:56:04)
[GCC 8.4.0] on linux
Type "help", "copyright", "credits" or "license" for more information.
>>> import torch
>>> import torchvision
>>> torch.__version__
'1.5.0'
>>> torchvision.__version__
'0.6.0a0+b68adcf'
>>>
Wrapping up
The reason for installing JetPack 4.4 and PyTorch 1.5.0 is to introduce DEtection TRansformer (DETR), a meaningful object detection related technology released by Facebook. DETR only works with the latest versions of PyTorch, 1.5 and torchvision 0.6 and later. In the next article, I will continue to introduce DETR.


댓글 없음:
댓글 쓰기